Showing posts with label recipes. Show all posts
Wednesday, August 21, 2013
Fig & Gorgonzola Crostini
The fig tree in our backyard is going crazy!! We have so many figs even after the army of birds comes every morning to eat to their hearts content. While fig jam is on my to-make list, it is still a major production... one that I am not ready to take on during nap time. Maybe next time my mother in law watches the babe for us and I have a solid 2-3 hour block of time, then I can commit to jam making. But this super simple crostini recipe on the other hand was one I could whip up in a few minutes. If you are buying figs in the store, pick them up within a day or two of when you plan on eating them. They do not keep well so should be eaten asap. If you have a fig tree (or know someone who does), all the better! Pick them and eat them the same day. As these bake, the Gorgonzola gets melty/creamy and the figs take on a softer texture and a sweeter (if that's even possible) flavor than they have in their raw state. A beautiful combination between salty & sweet, in my opinion.
You'll need:
1 baguette or any other rustic bread
4-5 fresh figs
Gorgonzola cheese
Thyme
Honey (preferably local!)
Preheat your oven to 400 and then wash and stem your figs.
Slice the baguette into slices about a half inch thick. If you slice on the bias, you'll get more surface area for holding Gorgonzola/fig/honey goodness.
Sprinkle with a tablespoon of Gorgonzola, then top with a few slices of fresh fig. You can simply cut the figs in half and lay them cut side up or slice them into multiple slices.
Pop into the oven and bake until the cheese starts to melt, about 6-8 minutes.
Remove from oven and drizzle with honey, then sprinkle with thyme leaves.
Eat warm or at room temperature.
Enjoy with a nice chilled glass of Sauvignon Blanc and you'll feel like you're at a top notch wine bar. Cheers!
Monday, December 19, 2011
Jalapeno and Bacon Stuffed Mushrooms
In my early teen years, my mom co-owned a restaurant called Perroni's. It was an Italian bar & grill type of place that had several appetizers which were irresistible to my 13 year old self. Dishes like garlic cheese bread with marinara on the side for dipping. I used to go into the kitchen and make a batch for myself, watching the cheese melt, bubble and brown as it went down the conveyor belt of the pizza oven. Every time I ate it I would think to myself, “I could live on this for the rest of my life.” I still actually feel that way.
The menu also had a sautéed mushroom appetizer that was pretty darn good. I don’t know exactly how they were prepared, but I do know it involved a lot of garlic and a lot of butter. These stuffed mushrooms taste a lot like those did, but are a bit more complex. Spicy and creamy, salty and crunchy, I feel like they are the sophisticated older brother of the sautéed ones from Perroni’s.
I made these over the weekend where we did my side of the family’s Christmas celebration and they were a hit. My step dad thought they were too spicy, so you can leave out the jalapeno seeds if you are spice sensitive. I really liked the heat, though.
Ingredients:
12 whole mushrooms, Large
¼ cups Panko bread crumbs
1 Tbs butter
3 slices thick cut bacon cut into lardons
1 whole jalapeno, minced
¼ cups diced yellow onion
1 clove garlic, minced
1 oz. cream cheese
2 oz. cheddar cheese
¼ teaspoons salt
¼ teaspoons fresh ground pepper
Instructions:
Preheat the oven to 350 F.
In a small bowl, combine the bread crumbs with the melted butter. Toss until evenly coated. Set aside.
Carefully clean and stem the mushrooms. Set the caps on a small baking sheet. Chop the stems and set aside.
In a small pan over medium heat, cook the bacon until crisp. Add the onion and garlic and saute until fragrant. Then add the jalapeno and mushroom stems and cook until softened, about five minutes. Season with salt and pepper to taste. Set aside to cool slightly.
In a medium bowl, mix the shredded cheese with the cream cheese until well combined. Add the bacon mixture and mix well.
Spoon the filling into the mushrooms caps and top with the buttered panko mixture.
Bake for 20 minutes, or until the mushrooms are tender and the topping is golden brown.
**You can prep these ahead of time by stemming the mushrooms and preparing the stuffing mixture. Refrigerating the mushroom caps separate from the mixture until ready to use. Make the bread crumb topping right before assembly.
Merry Christmas from our family to yours!
Labels:
recipes
Tuesday, October 18, 2011
Orange Balsamic Glazed Chicken
Yesterday, I was seriously craving Orange Chicken. Which is sort of weird, because I am not normally a huge fan of Chinese food. My husband loves it, and when I'm not around to cook he will usually have Pearl River delivered so he can get his Chinese fix. But yesterday, I felt like Orange Chicken and I felt like making it from scratch.
In my usual fashion, I was daydreaming about dinner while at work and did a search for Orange Chicken. I found several recipes and then decided to make a sort of Frankenstein recipe. I basically took a Rachael Ray recipe and made a couple of changes based on other ones and a couple of the reviewers ssuggestions.
This one is from 30 Minute Meals, so it is a quick and easy weeknight dinner. I think Scott was really impressed / intrigued that I was attempting to make it from scratch. (Or from "scraps" as he used to say when he was little).
Here is what you'll need to make 3 servings (or 4 light servings)
2 tablespoons extra-virgin olive oil
1 boneless skinless chicken breast
2 boneless skinless thighs
Salt and pepper
1 tsp poultry seasoning
3 tbsp all purpose flour, divided
2 sprigs fresh rosemary, chopped (or about 1/2 tsp dried)
1 tbsp butter
1/3 cup orange marmalade
1/4 cup balsamic vinegar
1/2 cup chicken stock
2 tbsp honey
a Squeeze of lemon juice
2 scallions, whites and greens, finely chopped
Directions:
In a large pan, heat the olive oil over medium-high to high heat. Chop the chicken into bite sized pieces, season with salt, pepper and poultry seasoning. Then coat with 2 tbsp of flour and shake off the excess.
When the oil is hot and ripples, add the chicken and brown for 5 minutes, then turn and sprinkle with rosemary. Cook until the chicken is cooked through, about 5 minutes more. Set aside on a plate.
In a 2 cup measuring cup, stir together the marmalade, vinegar and stock. Put the butter into the wok to melt, then sprinkle the last tbsp of flour to make a roux. Once it bubbles a bit, add the stock mixture. Whisk for 2 to 3 minutes or until the sauce has thickened and becomes a thin glaze. Stir in the honey and lemon juice and whick until blended.
Garnish with green onion. Serve with brown or white rice and a green veggie like zucchini or broccoli. Rachael ray says to top it with Arugula, which I am sure would be good, too.
I would advise that this be eaten up the night you make it. The leftovers weren't as good, in my opinion... but if you like re-heated chinese food, then I'm sure this will be perfect for you.
Labels:
everyday dinners,
recipes
Saturday, October 15, 2011
Skinny Sesame Peanut Noodles
Here is another delicious recipe from Cook Yourself Thin, my go-to low calorie cookbook. These Asian inspired noodles are cool and refreshing with layers of flavor from some peanut butter, fresh ginger and sesame oil. It also has a great balance of textures: you get the silkiness of the dressing and soft noodles plus a kicky crunch from the peppers, apple and jicama.
I debated reporting about this recipe on the blog. These noodles were super tasty and received rave reviews from my friends who ate it, but it was a little time consuming and I felt like it dirtied a LOT of dishes. Another gripe I had was the fact that you just need a little bit of each ingredient. You end up with a half used jicama, part of an apple, half a head of cabbage, half of a bell pepper. You get the idea, but I like recipes that use up the whole ingredient. This would be even worse if you were to half the recipe. Next time I will just use up the pepper, apple and jicama making it a little more bulky with produce instead of mainly noodles.
This is a great summer meal... even though it's October, it's still feeling like summer here in California.
The recipe:
8 oz whole wheat spaghetti (or Soba noodles if you want to go gluten free and nix the soy sauce)
for the dressing:
2 tbsp rice vinegar
1/4 c. low soduim soy sauce
1/4 c. natural peanut butter
2 tbsp grated ginger
1 tbsp sesame oil
1 tbsp dark brown sugar
the juice of 1 lime
1/2 c. hot water
assembly:
1/2 bag of store-bought coleslaw mix (or just 2 cups shredded cabbage)
1/2 c. red bell pepper, sliced thinly
1/2 c. cilantro, chopped
1/2 c. apple, sliced thinly
1/2 c. jicama, sliced or cubed
1/2 a lime, squeezed
1 tbsp sesame seeds, toasted
2 scallions, sliced
garnish:
dry roasted peanuts
more cilantro
Sriracha if desired
Directions:
Boil the pasta according to the package instructions. Drain and run under cold water. Set aside.
For the dressing, combine all ingredients in a small bowl and whisk until blended. Add to the drained and cooled pasta and toss.
Toss in all remaining ingredients and squeeze the lime juice over the top. Refrigerate for at least an hour. Serve cold. Garnish with peanuts and more cilantro if desired.I had some "5 Alarm" spicy peanuts which were perfect here. I also added a little Sriracha to give it more of a kick.
Serves 6 with 308 calories per serving.
Labels:
cooking,
recipes,
skinny recipes
Wednesday, September 7, 2011
Five Spice Turkey Lettuce Wraps
It's hard to get out of the weeknight dinner rut. I find myself making the same favorites over and over. I am pretty much always checking websites and blogs for new recipes, but sometimes it's just easier and safer to stick with what you know how to make and you know will be good ... because we all hate being dissapointed. But every once in a while I find a recipe online that just screams easy and safe but still exciting. This lettuce wrap recipes comes from Cooking Well so it is not only easy, but healthy and low cal. Extra bonus!
You'll need:
1/2 cup brown rice
2 teaspoons sesame oil
1 pound 93%-lean ground turkey
1 tablespoon minced fresh ginger
2 cloves of garlic, minced
1 large red bell pepper, finely diced
1 8-ounce can water chestnuts, rinsed and chopped
1/2 cup reduced-sodium chicken broth
2 tablespoons hoisin sauce
1 teaspoon five-spice powder
1/2 teaspoon salt
2 tablespoons soy sauce
2 heads Iceberg lettuce, leaves separated
1/2 cup chopped fresh cilantro. You can also use basil, mint and/or chives
1 large carrot, shredded
Sriracha if desired
Cook the rice according to package. Set aside once cooked.
Meanwhile, heat the sesame oil in a large nonstick pan over medium-high heat. Add turkey, garlic and ginger; cook, crumbling with a wooden spoon until the turkey is cooked through. Stir in the cooked rice, bell pepper, water chestnuts, chicken broth, hoisin, five-spice powder, soy sauce and salt; cook until heated through and sauce begins to thicken.
Divide lettuce leaves among plates, spoon some of the turkey mixture into each leaf, top with herbs and carrot and a squeeze of sriracha if you like it spicy.
Serves 4 with about 1 1/4 cups of filling each.
285 calories per serving.
This is the kind of dinner that leaves you feeling satisfied but not stuffed. It's also a good idea for low carbers out there- you can just omit the rice.
Labels:
everyday dinners,
recipes,
skinny recipes
Wednesday, August 3, 2011
Skinny Spaghetti Carbonara
I am not a traditionalist when it comes to food. You’d think because I lived and basically started my cooking life France, I would be… but I’m not. Unless I'm making something specific, for a special event, I do not take any recipe too seriously. I like to change them up, make them my own. Usually out of a sense of frugality, I like to use what I have on hand. And out of a childhood watching my mom throw this and that into a pot without ever really referencing a recipe, I find myself doing the same.
I know that many people might be offended when I call this Spaghetti Carbonara, when it has a few non-traditional ingredients. But what else can you call it? Carbonara-ish? I just call it “Skinny Carbonara” because it comes from one of my low-calorie cookbooks called Cook Yourself Thin: Skinny meals you can make in minutes.
I was introduced to Carbonara when I was living in France, and ever since then it has been one of those foods that sort of transports me back. It is warm and salty, creamy and comforting. This recipe is just as much of all of these things, but manages to do it in under 450 calories per serving. This is definitely on the dinner rotation at our house. Especially since we're T minus 19 days until our Lake Tulloch trip where we basically live in bathing suits 18 hours a day.
The recipe actually calls for 3 slices of bacon, but since it makes 4 servings, I usually do 4 slices. With one slice of bacon coming in at 70-100 calories adding one more only bumps the calorie count by 25 calories per serving. The 425 count includes the 4th slice.
Spaghetti Carbonara, adapted from Cook Yourself Thin
Serves 4
Calories per serving: 425
Ingredients:
4 slices of bacon
1 teaspoon olive oil
1 small onion, diced
1/3 cup 1% milk
1 large egg
8 ounces of spaghetti
1 cup frozen peas
1.5 ounces parmesan cheese, finely grated
4 tablespoons chopped flat leaf parsley
salt & pepper to taste
1. Cook the bacon in a large skillet over medium heat until brown and crisp. I like to slice it into lardons before cooking. Move to a paper towel and drain the bacon grease. Add the olive oil to the pan and then add the onion, stirring occasionally until soft and translucent. Remove from the heat.
2. In a large serving bowl, whisk together the milk and egg, then stir in the onion. Add a few grinds of black pepper and stir.
3. Bring a large pot of salted water to a boil. Cook spaghetti according to the package instructions. Two minutes before the spaghetti is done, add the peas. Drain the spaghetti and peas, reserving a half cup of the pasta water. Add the pasta/peas to the egg mixture, tossing until the pasta is well coated. I like to add in about a quarter cup of pasta water to give it a little body. Add the cheese, half of the parsley, salt and more pepper to taste.
4. Plate up the pasta, top with crumbles of bacon and garnish with parsley. Serve immediately.
Remember not to put the pot back on a burner once the egg mixture is in there. You dont want scrambled egg spaghetti. Also, something to be aware of: this recipe is best with regular pasta since whole wheat competes with the taste of the sauce.
Buon Appetito!
Labels:
everyday dinners,
recipes,
skinny recipes
Wednesday, June 15, 2011
Best Fish Tacos Ever!
Fish is super good for you. But unless you really like fish, it's difficult to incorporate it into your dinner rotation. I know I don't ever feel like fish. I never have a craving for a certain kind of fish. So in my case, a filet of Salmon, no matter how dressed up, is not going to be a regular meal staple. Anyone else in that boat with me? Then there are people with super-human resolve to eat healthy no matter how much they hate the flavors. Where the desire for a smaller waist outweighs the desire for that slice of pizza. I wish I had that kid of drive.
But these fish tacos are the perfect antidote to battle between healthy and tasty. They are made with any mild white fish (I used Talapia) cooked so simply that the meadly of flavors from the other ingredients shine right through. You get the lovely flavor of peppers, cilantro and corn tortillas with the health giving properties of the fish.
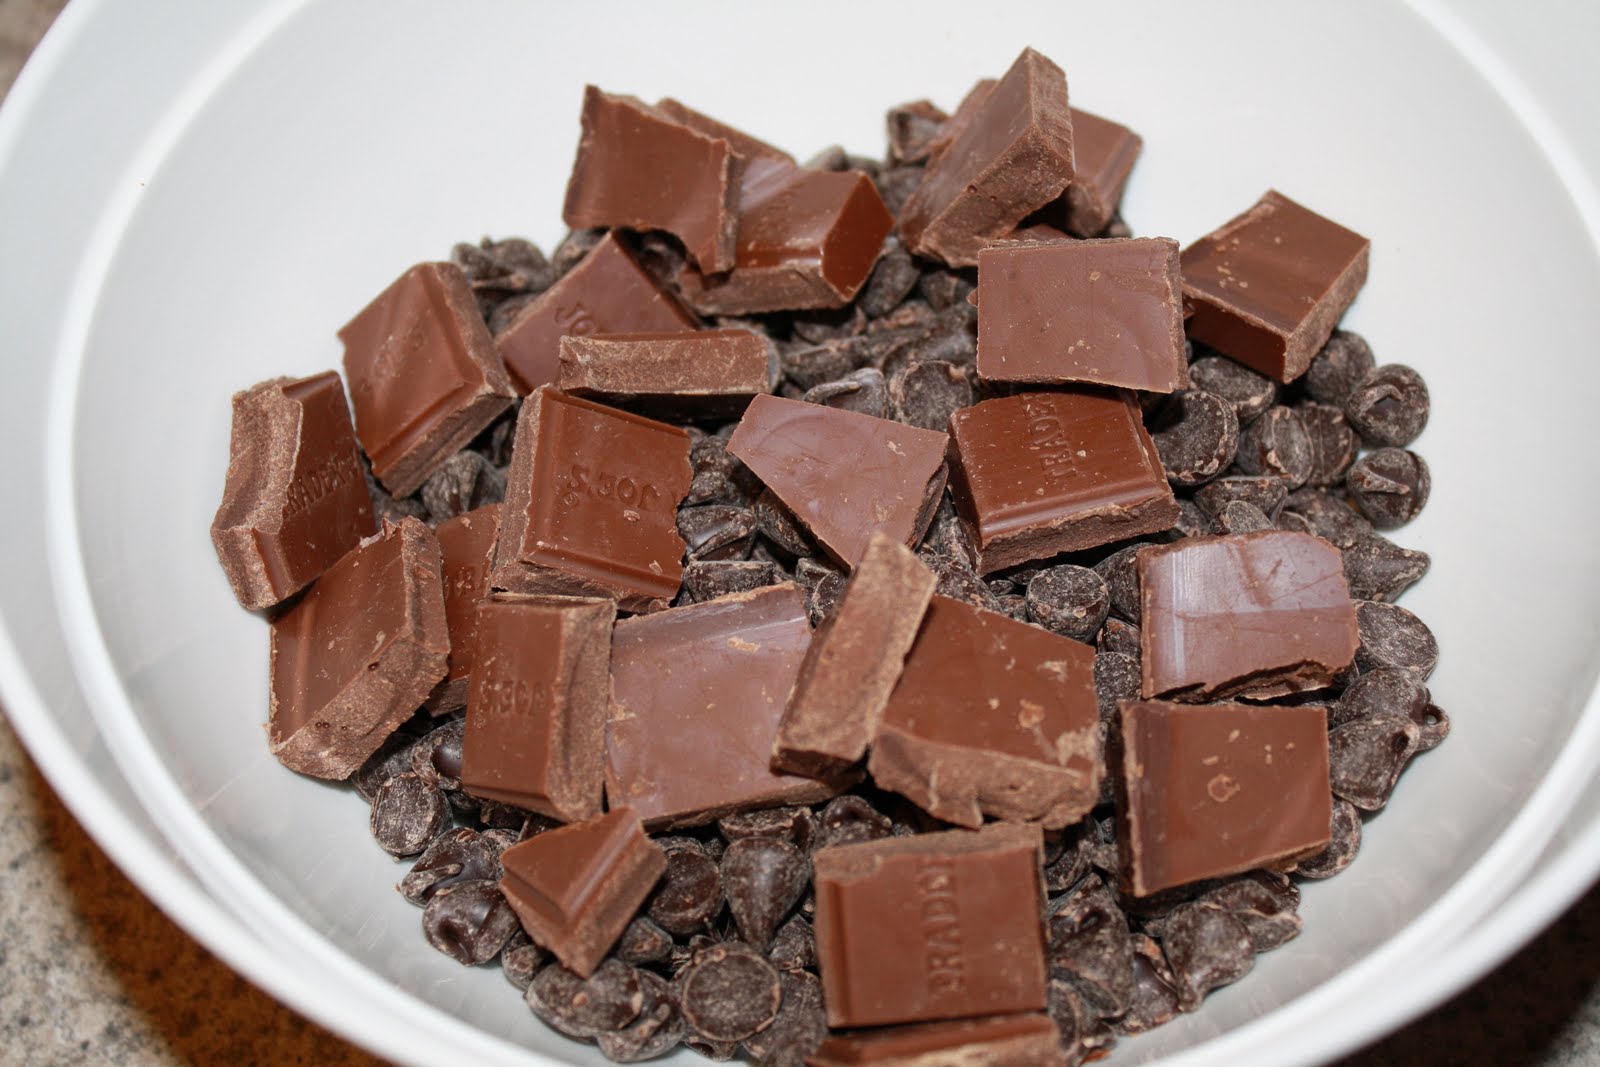
Let me intorduce you to the star of the show: The Green Sauce. I found this recipe on Sprouted Kitchen. As always, I will list the full recipe below.... but here is a quick run down of the tasty (and healthy!) ingredients that go into making this sauce:
cilantro, poblano peppers, plain yogurt, garlic, lime juice, olive oil, and cashews.
Hello, Super Foods galore!
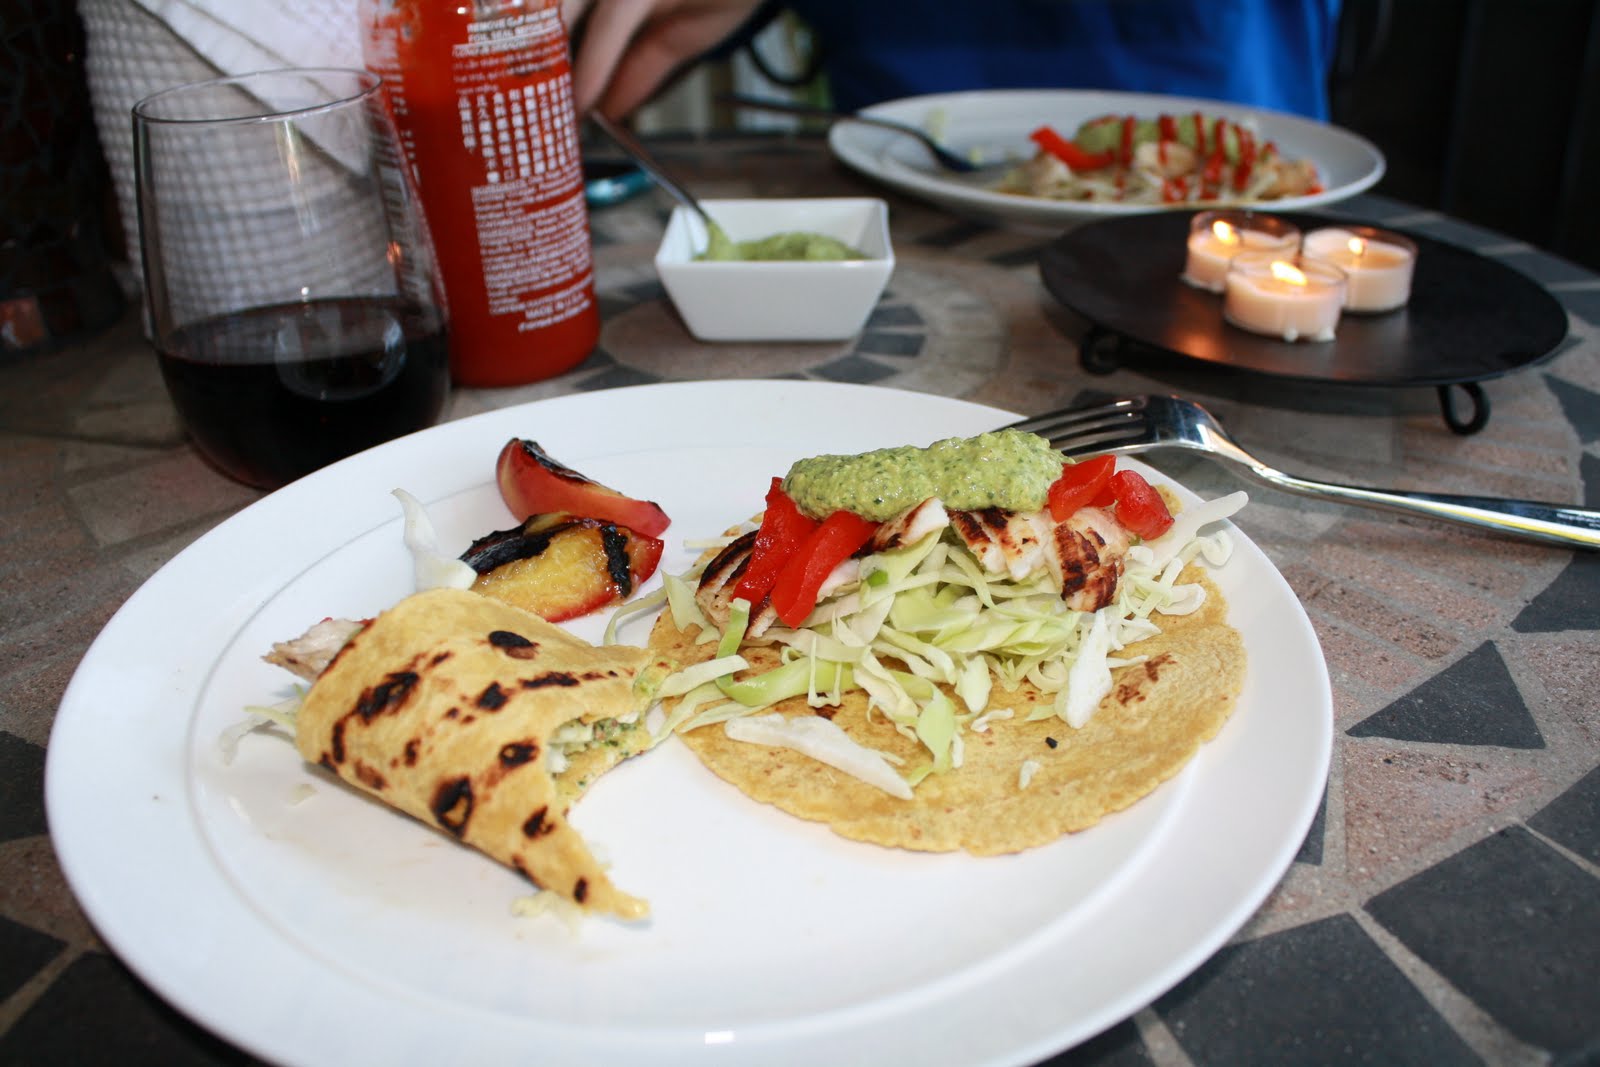
Add in there some shredded cabbage which is a classic fish taco pairing, some roasted red bell pepper and you've got an intensely flavored, perfectly filling and healthful meal. Plus, you get a serving of fish.
The original recipe calls for some peaches to be thrown on the grill while the fish is cooking. Have you ever had grilled peaches? Do you know that here in California, peaches are ALL OVER the farmer's markets right now and the weather is just screaming for you to rip the cover off your BBQ and get to grilling? Start with grilled peaches if this whole fish taco thing is too intimidating. You'll be glad you did.
I just love recipes that flow. Like a dance, the timing of each step is in perfect harmony with what is going on in another aspect of the prep. Let me explain: You meander on outside and crank up the BBQ. While that is heating up, go back inside and prep your fish - add salt, pepper and lime. Cover and pop in the fridge. Grab your peppers, go outside and put them on the grill. Back to the kitchen- take a few minutes to gather and measure the ingredients for the green sauce. Put everything into the blender and mix it up. Go outside and rotate the peppers. Take them off when they look charred. Put them in a zip top bag and let them hang out while you slice up the peaches....
Grab your fish and peaches, stroll outside and put both on the grill. While those cook, go back in and take the pepers out of their plastic bag cacoon, de-seed them and remove skin. Blend poblanos into the green sauce, put the bells in a dish for serving. Go outside and flip the fish & peaches, add the tortillas to the grill. Go back inside and shred your cabbage. Put in a bowl for serving. Take everything off the grill and you're ready to assemble.
Very rhythmic. Very relaxing.
Assemble them as you like- a bed of cabbage on the bottom is preferred. Layer the fish, the red bell peppers, green sauce, and if you like a little heat, I added some Sriracha to each bite as I went along. We ate the peaches as a side, but I suppose they would be a nice addition to the tacos themselves.
So if you've ever been intimidated by cooking fish, or you just aren't really a fan of fish to being with:
Try these tacos. You will be so happy you did.
Fish Tacos- adapted from Sprouted Kitchen.
4 to 6 corn tortillas
12 oz. white fish (use whatever is local and fresh)
2 cups of shredded green cabbage
1 lime, zest and juice
1 peach, cut into eigths
1 red bell pepper
Garlic
Salt and Fresh Ground Pepper
For the green sauce:
1.5 cups cilantro
2 cloves of garlic
1 lime, zest and juice
0.5 cup of plain yogurt
1 tbsp. olive oil
0.5 cup cashews (walnuts, pistachios, whatever not you have on hand will work)
2 Poblano peppers, roasted and seeds removed
Garlic
Salt and Pepper
Here are the details:
~Sprinkle each side of the fish with salt and pepper. Rub the lime zest and juice into the fish, place in a bowl and cover with plastic wrap. Refrigerate.
~Put the bell peppers and the poblanos on the grill and char on all sides, total time should be about 8-10 minutes. Remove peppers and put them in a plastic bag about 5 minutes. The steam in the bag will make the skin come off very easily. Take them out and peel the skin off using your fingers or a paring knife. Remove the tops and the seeds. Chop them up, keeping them separate.
~Put the cilantro, garlic, lime, yogurt and olive oil in a blender or food processor. Blend it up. Add the poblano and blend again. Add whatever nuts you are using and belnd until smooth.
~Put the fish on the grill on top of a piece of non-stick foil, or regular foil if that's all you have. Put the peaches on the grill, cut side down. Close the lid and grill for about 6 minutes. Flip the peaches and the fish and grill for about 4 more minutes. Place the tortillas on the grill to warm (watch them, they will burn quickly!)
~Remove the fish when it flakes with a fork.
~Assemble your tacos and enjoy!
Labels:
everyday dinners,
recipes
Thursday, June 9, 2011
The Perfect Cake for my Awesome Father in Law
My father in law's birthday is this weekend.
And what do you get the man who has everything??
A cake!
Obviously that would be the answer coming from someone who loves to bake, right? But I have to say that I have a sort of love/hate relationship with baking. The love part comes in the form of the actual process: the scouring over my favorite cookbooks (or blogs) for the perfect recipe, the gathering and measuring ingredients, sifting, stirring, scraping and baking. It is a very enjoyable process for me. The hate part comes in when I end up with a pile of chocolate chip cookies / box of cupcakes / pan of pound cake sitting on my counter... and ZERO willpower to resist the urge to eat it all. Can anyone relate to that?
So let's focus on the love part for a moment here. Step 1: finding the perfect recipe. I've mentioned my trusty copy of Baking Illustrated before. I adore how much information they give you on how to make the uber-scientific process of baking work out just right. I could spend hours flipping through this book, reading recipes and discovering special techniques for piping meringue, shaping Ciabatta or assembling Baked Alaska. Nerdy? Maybe.
The only problem with my beloved cookbooks is that I spend the majority of my day at work, and unless I lug them into the office with me, my main source of inspiration comes from cooking blogs. Enter my inspiration: Piece of Cake. Shauna has a recipe for a Birthday Cake from Baking Illustrated. Yellow Layer Cake with Chocolate Cream Frosting. Perfect for two reasons. #1- I knew I could look up the recipe when I got home. #2- because my father in law is fond of the classics. He's a no frills kind of guy. Just pure and simple deliciousness.
In the midst of my sifting and stirring and spreading, I took a moment to hand the paddle attachment covered in cake batter to my husband so he could "test it to make sure it wasn't poisonous". He asked if it was frosting. Yes, it is that good. And the (actual) frosting is so silky smooth, it's hard to resist eating it by the spoonful.
As for the hate part of my love/hate relationship; this is the perfect way to make amends: Always share with your friends, family & co-workers. And do what you need to do to make sure you don't come home with the leftovers!
Happy Birthday, Mike!
** I must give credit for the first, last and second to last photo on here to my sister in law's husband, Mark. He does amazing things with a camera. I hope to start taking some pointers from him in the future.
Recipe from Baking Illustrated.
Yellow Layer Cake
1 3/4 cups (7 oz) plain cake flour, sifted
4 eggs, at room temperature
1/2 cup whole milk, at room temperature
2 teaspoons vanilla extract
1 1/2 cups sugar
2 teaspoons baking powder
3/4 teaspoon salt
16 tablespoons (2 sticks) unsalted butter, softened but still cool, cut into 16 pieces
1. Adjust an oven rack to the lower-middle position, and preheat the oven to 350 degrees. Generously grease two 9-inch round cake pans, and cover the bottoms with parchment or waxed paper. Grease the parchment and dust the pans with flour, tapping out the excess.
2. Beat the eggs, milk and vanilla with a fork in a small bowl. Measure out one cup of this mixture and set aside. Combine the flour, sugar, baking powder and salt in the bowl of stand mixer. Beat on low to blend, about 30 seconds. With the mixer still running on low, add the softened butter one piece at a time, mixing until the butter and flour begin the clump together, until it looks pebbly with pieces about the size of peas, 30 to 40 seconds after all the butter is added.
3. Add the reserved one cup of egg mixture and mix at low speed until incorporated, 5 to 10 seconds. Increase the speed to medium high and beat until light and fluffy, about 1 minute. Add the remaining egg mixture in a steady stream with the mixer running, taking about 30 seconds. Stop the mixer and scrape down the bowl and beater. Beat at medium-high speed again until the batter is thoroughly combined and just starts to look curdled, about 15 seconds.
4. Divide the batter equally between the pans, spread to the sides of the pan, making sure the surface is even and smooth. I used an offset spatula here. Bake until the cakes are light gold in color and a toothpick comes out clean, about 20 to 25 minutes. Cakes may mound slightly here, but not to worry, they will level out when cooled. Cool on a wire rack for 10 minutes then run a knife along the edges to loosen them from the pans. Let cool completely before icing.
For the Frosting:
16 ounces semisweet chocolate, chopped fine (or use chips)
1 1/2 cups heavy cream
1/3 cup light corn syrup
1 tsp vanilla extract
Place the chocolate in a bowl. Bring the heavy cream to a simmer over medium-high heat in a small saucepan (Don't let this boil over! It makes a mess). Pour the cream over the chocolate, add the corn syrup and let the mixture stand for 3 minutes.
Whisk gently until smooth and then stir in the vanilla. Refrigerate for 1 to 1.5 hours, stirring every 15 minutes, until the mixture reaches a spreadable consistency. Ideally this would not be made ahead of time as it does not keep well. It should be consumed within a day. You can also whip the frosting with the whisk attachment on a stand mixer to create a frosting with a fluffier texture.
Tuesday, February 8, 2011
Stuffed Jalapenos
Everyone knows the Super Bowl is just an excuse to get together with friends, watch some funny commercials and eat LOTS of good food (right?!) So this past week, I was scoping my favorite websites for a fresh new appetizer to bring to my aunt and uncle's house for the BIG game.
Have you ever checked out Chow.com? I adore this site because it's not just recipes. They have discussion forums, food related articles, how-to videos.... the list goes on.
Anyway, Chow is a great website for appetizer recipes, like these Jalapeno Poppers. When I think of a popper, though, I think of breaded and deep fried. These are definitely not that. You don't pre-cook the peppers themselves at all, so they retain most of their crunch. The result is a fresh tasting stuffed pepper that doesn't really resemble it's mushy deep fried cousin at all.
Splitting and removing the seeds from the peppers was the most time consuming part of this recipe. If you wanted to prepare in advance, you could make the mixture and fill the peppers, then cover and refrigerate until ready to bake. If you want more heat (!!) add some of the seeds to the filling. Mine didn't come out too spicy. In fact, I didn't think they were that spicy at all. I would add some seeds back in the mix next time.
For the instructions on how to keep the peppers whole, see the original recipe which I linked up below. I wanted to halve mine for two reasons: #1- it would make more portions so I could stretch the recipe, and #2- the halves are good so people can eat them up in 1 or 2 bites without much mess. This two-bite aspect is pretty important for party food, in my opinion.
Just broil for a few minutes until golden and bubbly. Arrange them on a platter and you're ready for the big game! They should keep fine at room temp for a few hours.... if they last that long...
Mine sure didn't!
Recipe adapted from Chow.com. Click here to view the full recipe. I doubled it.
14 jalapeno peppers, split in half, seeds and ribs removed
8 ounces cream cheese, at room temperature
2 links of hot or sweet Italian sausage, cooked and crumbled (should yield about 1/2 cup)
1 tsp. olive oil
1/4 cup yellow onion, sauteed
1/2 teaspoon pepper
Turn the oven to broil and line a cookie sheet with foil. Set aside.
Halve and de-seed your jalapenos. Or follow the original recipe's instructions on how to remove seeds while keeping them whole. Line them up on your prepared cookie sheet.
Next, put your room temp cream cheese into a medium sized bowl. Set aside.
Cook the sausage in a saute pan and crumble it up into small pieces as you cook it. Drain and add to the cream cheese.
In the same pan, saute the onion in a bit of olive oil until translucent and starting to brown. Add to the sausage & cream cheese mixture. Stir in a few grinds of pepper, and then scoop into a ziplock or pastry bag. Pipe the mixture into the peppers. Broil for 4 minutes, then rotate the pan and broil for 4 more minutes until the cheese mixture is browned and bubbly. Let cool for 5 minutes and transfer to a platter and you're ready to party!
What are your favorite party foods??
Tuesday, December 21, 2010
Peppermint Bark
I always thought of myself as a dark chocolate kind of girl. I love to savor a small little chunk of super dark right after a meal. (I have this seriously intense chocolate craving the second I finish the last bite of my dinner). Dark chocolate really satisfies the craving and also makes me feel pretty darn good about myself... you know with all of the health giving antioxidants and such.
So anything with white chocolate I tend to think of as "not worth it"... but let me tell you, one little taste of this peppermint bark had my taste buds singing praises to white chocolate... even with it's lack of anti-oxidants. 'Tis the season, right? The silky smooth white blends amazingly with the dark. Add some crunchy freshness with smashed candy cane and you've got the perfect holiday treat.
I had never made any kind of bark before this. My husband is a big fan and wanted to make some (read: he wanted me to make some) for us to give out (read: give out half and gorge ourselves on the other half). So off to the store I went for chocolate and peppermint extract.
We had a GIANT homemade candy cane from one of Scott's co-workers so we used that for our topping. See how big it is? I was a little sad to destroy it, but happy that it went to good use (and a portion of it back to work with Scott)
I sort of wish I would have made more. I wasn't sure exactly how much the recipe would make, but figured I could always make another batch.
I am definitely going to make another batch.
The original recipe calls for the dark chocolate mixture to be melted directly in a saucepan, but mine morphed into some weird chunky slimy glop. It was totally irreversible and I had to toss it. I don't know what happened, but I had enough chocolate and whipping cream to do another batch, which I did with a double boiler and it came out fine. The 3/4 of a teaspoon of Peppermint extract in the dark mixture really gives it that extra punch of minty freshness... like you're in a Peppermint Patty commercial. Really.
So the key is to give each layer a chance to set up completely and have the next layer of melty chocolate be just lukewarm. Spreadable, but not hot enough to start smearing the layer underneath. We want a clean separation of white and dark here.
I sort of ran out of white chocolate for the top layer. My edges left the layers exposed, but I kind of like the way it looks. Like a peppermint bark pizza!
Trim it up as directed below and package however you wish. These little 4x6 inch "treat bags" from Michael's allowed for the perfect serving size. Not so much that people hate you for single-handedly causing 5 lbs in holiday weight gain. Just enough to make them love you and ask you for the recipe.
Layered Peppermint Bark Crunch
Adapted from Bon Appetit
Makes about 36 pieces
17 ounces good-quality white chocolate
6 ounces coarsely crushed peppermint candies (about12 regular candy canes)
7 ounces bittersweet or semisweet chocolate
6 tablespoons whipping cream
3/4 teaspoon peppermint extract
Line a baking sheet with a silicone baking mat or a sheet of heavy-duty aluminum foil.
Place the white chocolate in a heat proof bowl set over saucepan of barely simmering water to create a double boiler. Stir occasionally until the chocolate is melted and smooth and a candy thermometer registers 110°F. Pour 2/3 cup of the melted white chocolate onto the baking sheet, and using an offset spatula, spread it into about a 9x12-inch rectangle. Sprinkle with 1/4 cup crushed peppermints. Refrigerate until set, about 15 minutes.
Meanwhile, stir together the bittersweet chocolate, cream and peppermint extract in a double boiler or a bowl set over simmering water until just melted and smooth. Cool until it is lukewarm. Pour the dark chocolate mixture in long lines over the white chocolate rectangle. This is important to not melt the white chocolate layer. Using a clean spatula, spread the chocolate in even layer. Refrigerate until very cold and firm, at least 25 minutes.
Rewarm the bowl of white chocolate over barely simmering water again, to 110°F. Working quickly, pour the white chocolate over the firm bittersweet chocolate layer and spread evenly to cover. Immediately sprinkle the remaining crushed candy cane over the surface of the candy. Chill until firm, at least 20 minutes. I left mine in overnight before cutting.
If using a silicone mat, slide a spatula under the slab and move it to a cutting board. If using foil, lift the foil with the bark on it to a cutting board and trim it directly on the foil. Trim the edges of the slab to obtain nice clean edges with the layers visible, then cut the bark into pieces. You can snack on the edge pieces, or if you don't care about having perfect pieces, you can include the edges in your packaged up gift bags.
Can be made 2 weeks ahead and kept in an airtight container in the refrigerator.
Merry Christmas!!
Sunday, November 7, 2010
Salted Pumpkin Caramels
Fall is by far my favorite season. Especially here in California where you get those bright, sunshine filled days when the air is crisp and cool. It's like Fall combines the best parts of all of the other seasons- summery sun, cool winter temps and spring fresh air. My favorite holiday is also in the Fall. That magical day filled with family and friends, turkey and cranberries, parades and football on TV.
When it comes to Thanksgiving dessert, I have always been a Pecan Tart kind of girl. I like Pumpkin Pie, but never really get excited about it, if you know what I mean. I recently found a recipe that gives life to your old can of pumpkin puree. Salted Pumpkin Caramels. Now these I can get excited about.
The recipe calls for your standard caramel ingredients of sugar, corn syrup and butter and throws in some extra Thanksgiving-ish ones like pumpkin puree, pumpkin pie spice and maple syrup. For a little festive punch, the bottoms of the caramels are lined with pumpkin seeds.
A side note about the pumpkin pie spice: if you don't have any, check your spice rack before buying some. If you have cinnamon, nutmeg, ginger, allspice and ground cloves, you have everything you need. This recipe calls for 1 teaspoon of pumpkin pie spice. Just combine a scant quarter teaspoon of each spice listed above in a small dish. Easy! And it saves you $4.
I have found that the weather has a lot to do with how caramel sets. The temperature and humidity all effect how soft or firm the caramels turn out. You also have to pay close attention to the temperature of the mixture, so make sure you use a candy thermometer. Bring it up too high and you'll have rock hard caramels. Don't get it hot enough and the caramels wont set. The more you make them, the better you'll get a feel for how to get them just right. It really is more of an art than a science.
Resist the temptation to scrape the sides of the pan when you pour it out. The tiny crystals you scrape off will cause you to have grainy caramel. In the words of Alton Brown: Definitely NOT good eats. I realized this after the fact and had a few pieces that were sugary and grainy :(
Use a hot knife to cut the slab into equal quadrants. Original recipe states a 64 piece yield which means they will be about 1" cubes. If you're not sure if you're cutting them in the right size, but want uniformity, cut the slab into 4. Then cut each one of those pieces into 4 smaller squares. Each of those smaller squares will then make four 1" cubes. Make sense?
Don't these just look beautiful? So festive, and the pumpkin-y spiciness of it is very Fall :)
Original recipe can be found at Food 52, a new website I recently stumbled upon. From their site description: "At food52, we recognize talented home cooks by giving them a place to show off their work, a place where cooks of all kinds come to be inspired and engaged in lively conversation." How fun!
Salted Pumpkin Caramels (From Cheese1227's recipe posted on Food52)
2/3 cup unsalted pepitos (pumpkin seeds)
1 1/2 cups heavy cream
2/3 cup pumpkin puree
1 teaspoon pumpkin pie spice (see note above if you do not have pumpkin pie spice)
2 cups white sugar
1/2 cups light corn syrup
1/3 cup good maple syrup
1/4 cup of water
4 tablespoons unsalted butter, cut in chunks
1 teaspoon lemon juice
3/4 teaspoon fleur de sel
Directions:
Dry toast the pepitos in a skillet until they start to pop being careful to move them around so they don't burn.
Line the bottom and the sides of an 8-in square pan with parchment. Butter the parchment on the sides of the pan. (I actually didn't line the sides with parchment, I just heavily buttered them.) Evenly spread out the toasted pepitos on the bottom of the pan, on top of the parchment.
In a saucepan, combine heavy cream, pumpkin puree and spices. Warm the mixture, but do not let it boil.
In a second heavy bottomed pan, with sides at least 4 inches high, combine the sugar, both syrups and water. Stir until the sugars are melted, then let it boil until it reaches 244 degrees (the soft ball point on a candy thermometer). Carefully add the cream and pumpkin mixture and slowly bring to 240 degrees on a candy thermometer. Stir frequently and adjust the heat as needed.
As soon as it reaches the 240, pull it off the heat and stir in the butter and lemon juice. Stir vigorously until the butter has melted.
Pour the mixture into the prepared pan. Let cool 30 minutes and sprinkle the salt over the top. Let the caramels fully set (at least 2 hours) before using a hot knife to cut them into 1-inch squares. You can wrap them individually in waxed paper, or arrange on an elegant plate to present at a party. Or just hover over the counter in the kitchen and shovel them directly into your mouth as fast as you can :)
Thursday, November 4, 2010
Broccoli Cheese Soup
I am almost certain this recipe was thought up one night by someone who needed to use up the ingredients that were lingering in the fridge. I believe this because that's exactly what lead me to make this soup on Monday night. I had 3/4 of a package of broccoli florets from Trader Joe's and a motley crew of cheeses, all needing to be consumed asap.
Everyone keeps a few onions on hand, right? You should if you don't. They last a long time if stored properly, not to mention almost every great recipe starts with butter, onions & garlic! The fragrance of those three simple ingredients cooking away in a pan makes me swoon every-single-time. It never fails.
You can use any cheese you have, really. I just used my leftovers from a cheese plate we brought to a friends house. Anything that will melt. I'm sure there are cheeses that go better with broccoli than others, though. Feel free to experiment.
Since I was sort of winging this recipe when I made it, I steamed the broccoli in the stock, then sort of mashed them up with my potato masher. I then added in the onion roux mixture. After looking up a couple of Broccoli Cheese Soup recipes, it seems you can do the roux, whisk in the chicken stock then add the broccoli to that. Cook until tender and then blend. (See Emeril's recipe I link below)
If you don't usually keep chicken stock on hand, I highly recommend these little packets from Trader Joe's. They give you 12 packets to a box, its is basically chicken stock concentrate. Add 1 packet to 1 cup of hot water and voila! The don't take up any space in the pantry and last for a couple years. Like bouillon. Brilliant.
Below is a basic recipe, feel free to experiment with different cheeses and maybe some spices. Emeril has an interesting recipe here that I may try next time.
ANC's Broccoli Cheese Soup
2-3 tablespoons butter
1 cup white or yellow onion, chopped
1/2 teaspoon salt
1/4 teaspoon pepper
1 teaspoon garlic, chopped
3 tablespoons all-purpose flour
3 cups chicken or veggie broth
1 package of broccoli florets (or frozen broccoli)
1/2 cup half and half
3/4 cup Cheddar cheese
3/4 cup Gruyere cheese
In a large sauce pot bring the chicken stock to a boil. Add the broccoli and cook / steam until tender, for 10 minutes. Once tender, partially mash the florets with a potato masher to break them up.
Meanwhile, in a medium frying pan, melt the 3 tablespoons butter over medium-high heat. Add the onions, salt and pepper and cook until soft. Add the garlic and stir for about 30 seconds. Next add the flour and stir until all of the moisture is soaked up by the flour. Let it cook for a minute or two to eliminate any raw flour taste. Turn off the heat and stir in the half and half.
Add the contents of the frying pan to the pot of broccoli and stir until blended. Remove from the heat and puree with an immersion blender. Add the grated cheese and stir until melted.
Serve warm with bread sticks or crusty french bread.
Perfect for a cool fall evening with the one you love <3
Labels:
recipes
Subscribe to:
Posts (Atom)


.jpg)
