Thursday, August 22, 2013

Chicken Salad, Pioneer Woman Style

 
If you're a Chicken Salad purist, you might want to look away. This is a far cry from the classic Chicken Salad recipe which typically is very plain- some mayo, lemon juice and celery. Maybe a nut of some sort like almonds. Or for the more adventurous: grape halves and walnuts. This Pioneer Woman recipe anything but classic. Blueberries? In Chicken Salad? An unexpected and sort of questionable ingredient, but it really works! The addition of Feta to the dressing and dill to the salad make it bright and tangy and fresh. From here on out, I don't think I'll make Chicken Salad any other way. It's that good...

And isn't it pretty? I envision this being a very versatile dish: It would be a great low carb dinner as-is, a beautiful addition to a bridal shower luncheon or even a super bowl finger food scooped onto mini buns and made into sliders. I plan on eating this new favorite year round.

Adapted from the Pioneer Woman. Measurements below make4- 6 servings, depending on appetites :) 

2 chicken breasts, boneless skinless
Olive Oil
Salt And pepper, to taste 

2 stalks celery finely diced, plus some leaves, chopped
1 ear of corn, roasted
1/4 of a medium red onion, diced 
2 Tablespoons Fresh Dill, Minced 
1/2 cup sliced almonds, dry toasted in a pan 
3/4 cup fresh blueberries

For the dressing:
2 Tablespoons Mayonnaise 
2 Tablespoons Sour Cream 
2 Tablespoons Half & half (or milk if you don't have half & half)
1/2 a lemon 
1/2 tsp sugar
1/2 cup feta, crumbled
salt & pepper to taste

Directions:

Cook chicken breasts using your preferred method. You could use a grill pan, frying pan, bake it, poach it or BBQ it.

*Since it is summer, I BBQ'd mine. I simply fire up the grill on high to pre-heat. Meanwhile, drizzle the chicken with olive oil, then sprinkle with salt and pepper. Place the chicken on a hot grill, then turn down the heat to medium low. Pull down the cover on your BBQ and let cook, undisturbed for about 7 minutes. Flip them and continue cooking (covered) for another 5-7 minutes. They are done when the internal temperature reaches 165.

When you flip your chicken, grab your corn and place it on the grill. Let it go, rotating it every so often, until your chicken is done. The original recipe calls for just plain raw corn, which is really good, but I like it when corn gets a little blackened and takes on a sweeter, less raw flavor. You could do it either way.

Take everything off the grill. Let chicken cool.

When your corn is cool enough to handle, shave the kernels off the cob. Combine corn with the onion and celery. Set aside.

Into a canning jar with lid, add mayonnaise, sour cream, feta, and half & half. Add sugar, lemon juice, and salt and pepper. Shake to combine. Taste it and add more salt if needed. It does need quite a bit of salt.

Cut your chicken up into bite sized pieces. The Pioneer Woman sort of slices hers on the bias into randomly sized pieces, but I like mine a little more uniform. Put your chicken in the bowl with celery, onion, and corn. Stir to combine. Sprinkle in the dill. Pour half the dressing over the ingredients and toss gently. Add more dressing as needed. I think I used the whole thing, but you don't want to over dress this, so go easy at first.

When ready to serve, toss in the blueberries to lightly coat them in the dressing. Sprinkle with feta and almonds... and a few more blueberries if you're feeling extra non-traditional.

Delicious, right?

Wednesday, August 21, 2013

Fig & Gorgonzola Crostini


The fig tree in our backyard is going crazy!! We have so many figs even after the army of birds comes every morning to eat to their hearts content. While fig jam is on my to-make list, it is still a major production... one that I am not ready to take on during nap time. Maybe next time my mother in law watches the babe for us and I have a solid 2-3 hour block of time, then I can commit to jam making. But this super simple crostini recipe on the other hand was one I could whip up in a few minutes. If you are buying figs in the store, pick them up within a day or two of when you plan on eating them. They do not keep well so should be eaten asap. If you have a fig tree (or know someone who does), all the better! Pick them and eat them the same day. As these bake, the Gorgonzola gets melty/creamy and the figs take on a softer texture and a sweeter (if that's even possible) flavor than they have in their raw state. A beautiful combination between salty & sweet, in my opinion.

You'll need:

1 baguette or any other rustic bread
4-5 fresh figs
Gorgonzola cheese
Thyme
Honey (preferably local!)

Preheat your oven to 400 and then wash and stem your figs.
Slice the baguette into slices about a half inch thick. If you slice on the bias, you'll get more surface area for holding Gorgonzola/fig/honey goodness.
Sprinkle with a tablespoon of Gorgonzola, then top with a few slices of fresh fig. You can simply cut the figs in half and lay them cut side up or slice them into multiple slices.
Pop into the oven and bake until the cheese starts to melt, about 6-8 minutes.
Remove from oven and drizzle with honey, then sprinkle with thyme leaves.
Eat warm or at room temperature.

Enjoy with a nice chilled glass of Sauvignon Blanc and you'll feel like you're at a top notch wine bar. Cheers!

Monday, July 8, 2013

Our Birth Story


It has been a year and a half since I last posted to this blog. I have missed it, but at the same time, I've rarely had time to think about how much I missed it. Since my last post, we moved, I started a new job, had a baby and then made the HUGE decision to stay home with our precious peanut. Needless to say, there has not been a lot of extra time for me to spend blogging. I am hoping to get back to posting regularly... about the food we're eating, the projects I am working on, and most likely, a lot of baby and family related ramblings.

I would like to jump back in with a post about the birth of our baby. There is something so special about a birth story. Every one is different. Every one so sacred to the family to whom it belongs. When I tell people I was lighting candles and drawing a bath in between contractions at 1:00am all while my husband snoozed away, the response is usually, "what? why?"

So with that, I should really start at the very beginning when I was about 4 months pregnant. I somehow got it into my head that I wanted to have a natural childbirth, that is, without any pain medication. I don't know if it was the epidural horror story I heard from a co-worker or just the hippie in me coming out to play. Either way, I really felt in my heart that I could have my baby without drugs. Even my doctor got excited for me when I mentioned it to her. She had both of her daughters without drugs and told me that for her it was like an endurance sport (she used to cycle competitively) and since I have participated in both swimming and running endurance events, I could totally relate to that! So I was starting to really think I could do this, but I also knew I would need some coaching. After a few Google searches, we found a place called Harmony Birth in Campbell, CA who offered several different types of classes to prepare you- mentally, physically and emotionally- for bringing a child into this world sans drugs. We signed up for their class called Birthing Naturally, which is based upon the Bradley Method of Natural Childbirth. I may do another post on the class and what I learned in my own journey because there is sooooo much to tell. I will say that what we were taught in that class was absolutely necessary in preparing us (my husband included) for what was to come. In all sincerity, after the class was over, I knew that if it came down to it- if there was an emergency or some crazy catastrophic disaster happened- I could deliver my baby without assistance or intervention from anyone. Like side of the road / back of a taxi / on the bathroom flood action. Really. And that is a lot of what The Bradley Method and other natural child birth advocates like Ina May Gaskin teach you- that the process of giving birth is natural, intuitive and can be accomplished by any woman with very little help. Anyone can do it. You just have to prepare yourself.


Our due date was 12/31/12, but I had a feeling she would be a few days late. I was feeling good so we went to an New Year's Eve party at a friend’s house. Here I am on my due date:


One of the women at the party was telling me a story about how she was leaking amniotic fluid when pregnant with her daughter. She went in for a routine check up and as an afterthought mentioned it to her doctor. She was tested on the spot and had to be induced way before her due date. They hadn't even packed their hospital bags, much less brought them to the appointment. I had periodically been experiencing some leaking fluid, and after hearing her story, I was starting to get a little paranoid, so on January 2nd, we went in to L&D to have it checked. The test strip they use came back negative for amniotic fluid, but as I was hooked up to external fetal monitoring, the nurse told me I was having some contractions. I was feeling something but I didn’t know that those were contractions; this was my first baby after all. I had been feeling little pains for a few days (and really, all throughout my pregnancy I had weird little twinges so I thought those pains were just normal pregnancy happenings). I took a mental note of what a contraction felt like and we were discharged from L&D. I felt GREAT relief that it was not amniotic fluid as I did not want to be induced. I was very concerned that induction would lead to pain medication and thus the snowball effect of medical intervention. It was bad enough that I was GBS positive and would need an IV for antibiotics at least 4 hours before delivery (which did not end up happening, by the way).

After visiting L&D, I went to see my acupuncturist the morning of January 2nd to try to get things moving naturally. We also had a regular doctor checkup at 3:15pm that day with my NP. She checked me (my first internal check ever during my pregnancy) and told me I was 3 cm dilated. I asked her to “sweep the membranes” while checking me which was something our doula was having us consider as another way to get things moving. We left the appointment confident that we would be meeting our precious baby soon! Scott was off work for the remainder of the day so we went home and had some time to relax together. “Real” contractions that we recognized as ones we should start timing started about an hour after our appointment, around 4:30pm on January 2nd. They varied anywhere from 10-15 minutes apart so we just did our relaxation exercises we learned in class and stayed distracted with watching Jumungi.  Per our doula’s recommendation, we went to bed at 9:30 and tried to get some sleep. 

At 12:30am on January 3rd, I was awakened by a pretty heavy contraction. I grabbed my phone and got the contraction timer started. They were about 6 minutes apart. I worked through a few of them in bed but soon became too uncomfortable and decided to try to get in the bath. I did not wake Scott up as I wanted him to get as much sleep as possible. In my mind, I was going to have a long labor and I wanted him to be as rested as possible. I drew a bath in the hall bathroom and turned on our battery operated candles. I also lit a few real candles… all of this was in between contractions. They were getting a bit debilitating at this point. I climbed in the bath and tried to relax. James Bond, our cat, was so curious and in and out of the bathroom checking on me. He kept me company as I breathed through 2 or 3 more intense contractions in the bath. They quickly got to 3-4 minutes apart and the water was getting cold. I got out and was milling about in our room, which woke Scott up. He called the doula and told her to head over to our house… things were happening! Just as he got off the phone with her, I started having a pretty intense contraction that made me so nauseous that I vomited... I was on all fours in our bed and asked Scott to grab the bowl that I had placed by the bedside. Afterward, I got up and walked to the bathroom and noticed some blood dripping down my leg. At that point Scott said we should go to the hospital.

Honestly, I was still thinking we had some time to labor at home. In retrospect, I was definitely in transition and should have recognized it with the vomiting and all. I think I was waiting for the contractions to get to the point of being unbearable since that is what everyone told me would happen… the contractions would be so bad I would be begging for an epidural. Since I was not feeling that yet, I assumed I was not even close. But the blood was a bit frightening so we decided it was time. We called the doula and re-routed her to Kaiser.

The drive was quick and we got to Kaiser at about 2am. We had to check in through the Emergency Room as the entrance to the hospital was closed after hours. They sent someone down with a wheel chair to wheel me up even though I felt like I would have been better off walking. By the time we got up to L&D and into a room and they checked me I was 9cm dilated! I reminded them that I was GBS positive and needed IV antibiotics. It was part of our birth plan for me to have a heplock instead of a full on IV for the antibiotics. I wanted them to be administered and then all of the tubes to be removed. I didn’t want to be connected to a bunch of tubes while in labor. The nurse hooked me up and began administering fluids along with the antibiotics. I told her I did NOT want fluids and that I wanted to her to get the the abx in me and remove the IV line. She wasn’t listening to me, but the midwife, bless her heart, asked the nurse why she had me hooked up to fluids when I asked not to be. She explained that she didn’t want the abx to burn going in so she was combining them with fluids. This procedure was making it take even longer to get the abx in, so the midwife instructed her to stop the fluids and do what I had asked for. She complied.

I was in hard labor, sitting cross legged with my fists pushing down at either side to lift me up a bit when the Midwife suggested I lay down. Apparently, I was “sitting on the baby’s head”. Any movement at this point was pretty painful but I reluctantly agreed. She brought in a birthing bar that they attached to the bed so I could pull myself up or lean on it. I ended up using it to push against with my feet as the midwife instructed me how to pull my body into a curve and push. The doula arrived and got some aromatherapy going which was the most amazing smell to me at that moment. I was so relieved to have her there. Just the peace of mind knowing she was on stand by just in case. Scott was doing all he could to make it bearable for me- holding my hand, giving me his arm to pull on, giving me water when I felt thirsty, which was pretty much every 2 minutes. I was definitely in the zone, focusing only on breathing through my contractions and drinking water (which was the best tasting water I've ever had, by the way).

 By 3:15am I felt the urge to push... About 30 minutes of pushing (and figuring out how to push and at the right time!) out she came! I wasn't really sure how hard I needed to push, so I think that is the only reason it took 30 minutes. I started out with some pretty weak pushes and after realizing that those were getting me nowhere, I started to really bear down with some effort. I was feeling everything, including the tearing that was happening. I let out a loud yelp with the final tear and before I had time to even think about it, our baby girl was on my chest. I was feeling her warm slippery body against my skin. What a surreal moment. I remember feeling so tired, but also so very alert. Above all, I was extremely thankful that everything had gone well. We were now a family of 3! Pretty amazing stuff.


Monday, December 19, 2011

Jalapeno and Bacon Stuffed Mushrooms


In my early teen years, my mom co-owned a restaurant called Perroni's. It was an Italian bar & grill type of place that had several appetizers which were irresistible to my 13 year old self. Dishes like garlic cheese bread with marinara on the side for dipping. I used to go into the kitchen and make a batch for myself, watching the cheese melt, bubble and brown as it went down the conveyor belt of the pizza oven. Every time I ate it I would think to myself, “I could live on this for the rest of my life.” I still actually feel that way.
The menu also had a sautéed mushroom appetizer that was pretty darn good. I don’t know exactly how they were prepared, but I do know it involved a lot of garlic and a lot of butter. These stuffed mushrooms taste a lot like those did, but are a bit more complex. Spicy and creamy, salty and crunchy, I feel like they are the sophisticated older brother of the sautéed ones from Perroni’s.

I made these over the weekend where we did my side of the family’s Christmas celebration and they were a hit. My step dad thought they were too spicy, so you can leave out the jalapeno seeds if you are spice sensitive. I  really liked the heat, though.


Ingredients:
12 whole mushrooms, Large
¼ cups Panko bread crumbs
1 Tbs butter
3 slices thick cut bacon cut into lardons
1 whole jalapeno, minced
¼ cups diced yellow onion
1 clove garlic, minced
1 oz. cream cheese
2 oz. cheddar cheese
¼ teaspoons salt
¼ teaspoons fresh ground pepper


Instructions:

Preheat the oven to 350 F.

In a small bowl, combine the bread crumbs with the melted butter. Toss until evenly coated. Set aside.

Carefully clean and stem the mushrooms. Set the caps on a small baking sheet. Chop the stems and set aside.

In a small pan over medium heat, cook the bacon until crisp. Add the onion and garlic and saute until fragrant. Then add the jalapeno and mushroom stems and cook until softened, about five minutes. Season with salt and pepper to taste. Set aside to cool slightly.

In a medium bowl, mix the shredded cheese with the cream cheese until well combined. Add the bacon mixture and mix well.

Spoon the filling into the mushrooms caps and top with the buttered panko mixture.

Bake for 20 minutes, or until the mushrooms are tender and the topping is golden brown.

**You can prep these ahead of time by stemming the mushrooms and preparing the stuffing mixture. Refrigerating the mushroom caps separate from the mixture until ready to use. Make the bread crumb topping right before assembly.

Merry Christmas from our family to yours!
 

Friday, December 2, 2011

Crafty Holiday Garland


I am reeeeeeally bad when it comes to Christmas decorations. After college when I lived with my sister, she would always go out and get a Christmas tree and hang all of her ornaments with care. I was just never that into it. It's not that I don't like them... I absolutely love the holiday feel the house takes on immediately upon plugging in the lights on a tree. But after I moved out and into my own place, I never got a tree of my own. I never put out any decorations except a single strand of white lights in my palm tree and a little nativity scene my mom got for me. I just wasn't into it.

But this year will be different.


This year we are going to get a Chritmas Tree. We ordered Stockings from Pottery Barn with our names embroidered on them. I am going to build up my collection of ornaments, tabletop Santa stuff and cinnamon scented pine cones.

Our house will feel like Christmas this year.

The inspiration for this garland came from Pinterest (surprised?) Here is the site where I found the tutorial. She does a really good job of explaining it.
 I got all of the paper in the scrapbooking section at Michael's and used a Fiskars circular punch to get perfectly round discs. You need about 7 circles per piece.


 Fold each circle in half like a taco with the patterned side you want to show on the inside. Start to glue them together, attaching the wrong sides together. I started to use hot glue, but found it to be a little bulky. Keep gluing one half to the next until you have 7 and it looks like a little book. Put a line of glue down the"spine" of your little book and attach it to your twine or ribbon. Glue the last 2 sides together to secure to the twine.


String this baby up wherever you need a little bit of Christmas cheer!


Thursday, December 1, 2011

Cinnamon Pumpkin Smoothie

It's not often that I get to have in-person conversations with fellow bloggers. I never really get to talk to people about what motivates them to write in such a public way. I know everyone has an "About Me" section, but I think it goes without saying that there is way more to a person than a two line biography. Something that has been on my mind lately is this: when people take breaks from blogging or have gaps of time where they don't post anything... what is the reason? I know life can take over, people go on vacations, have babies, come down with illnesses etc. but I would love to hear if anyone else is like me...  
simply unmotivated at times. 


This morning I woke up to fall leaves everywhere. We had quite the blustery wind storm come through last night. It blew away all of the fog that has been lingering around here lately and left nothing but golden sunshine and... leaves. Everywhere. I snapped this picture walking to my car on the way to work. The leaves where almost completely covering the sidewalk right here. I think I've said it before, but my favorite days are the ones in the fall or winter when the air is crisp and cold and the sun is shining warm on your face. It's such a refreshing and energizing feeling. Inspiring, really.


So what to post about other than the weather? This smoothie. I have made it twice now, yesterday and today. Smoothie's for breakfast are perfect, but not really ideal for winter. But for some reason, probably the spicy pumpkin flavor, this one hits the spot.


I found a recipe via Pinterest and decided to make my own version. I blended up the following:

5-10 ice cubes
1 cup unsweetened almond milk
1/2 cup pumpkin puree
1/2 cup plain greek yogurt
1/2 of a frozen banana (i peel a banana, break it in half and put it in a ziplock in the freezer)
1 scoop vanilla protein powder
a squirt of Agave nectar
dash each of cinnamon, nutmeg and clove

Here is the original recipe so you can see what other variations are possible.

I put in in one of those insulated reusable cups that are starting to pop up everywhere and took it as my breakfast on the run. It protects against frozen fingers.


Some healthy nutrition facts about these ingredients:
  • Pumpkin is a great source of fiber, Vitamin A, C, E as well as Zinc. It is also high in carotenoids which assist in staving off the free radicals in the body and help in preventing premature aging, cardiovascular diseases and other infections.
  • Greek yogurt has about 20 grams of protein per cup which help to keep you feeling full longer. It is a great non-meat source of protein.
  • Bananas contain potassium and B6 and are fat free, cholesterol free and sodium-free.
  • Almond Milk had only unsaturated fat which is great for people who need a heart-healthy diet. It also contains omega-3 fatty acids which are known to lower bad cholesterol, improve mood, treat arthritis and enhance memory.
  • Cinnamon is like a wonder spice. Listen to all this: It contains manganese, fiber, iron, and calcium. It also has anti-inflammatory properties which protect against heart disease. Studies have shown it may significantly help people with type 2 diabetes improve their ability to respond to insulin, thus normalizing blood sugar levels. It also may significantly lower LDL “bad” cholesterol, total cholesterol and triglycerides. The fiber and Calcium it contains have been known to bind to bile and remove it from the body which can prevent damage that certain bile salts can cause to colon cells, thereby reducing the risk of colon cancer! Just smelling this wonderful spice can help improve brain function! Amazing, isn't it!?


Speaking of motivation, just doing a little reaearch and discovering all of the amazing things that healthful food choices can do for the body seriously motivates me to make better food choices. I am all for indulging during the holidays, but it also feels really good to nourish my body with food.

I hope everyone else is enjoying the weather and the amazing fruits and veggies that winter has to offer.

Tuesday, October 18, 2011

Orange Balsamic Glazed Chicken

Yesterday, I was seriously craving Orange Chicken. Which is sort of weird, because I am not normally a huge fan of Chinese food. My husband loves it, and when I'm not around to cook he will usually have Pearl River delivered so he can get his Chinese fix. But yesterday, I felt like Orange Chicken and I felt like making it from scratch.


In my usual fashion, I was daydreaming about dinner while at work and did a search for Orange Chicken. I found several recipes and then decided to make a sort of Frankenstein recipe.  I basically took a Rachael Ray recipe and made a couple of changes based on other ones and a couple of the reviewers ssuggestions.

This one is from 30 Minute Meals, so it is a quick and easy weeknight dinner. I think Scott was really impressed / intrigued that I was attempting to make it from scratch. (Or from "scraps" as he used to say when he was little).


Here is what you'll need to make 3 servings (or 4 light servings)

2 tablespoons extra-virgin olive oil

1 boneless skinless chicken breast
2 boneless skinless thighs
Salt and pepper
1 tsp poultry seasoning
3 tbsp all purpose flour, divided

2 sprigs fresh rosemary, chopped (or about 1/2 tsp dried)
1 tbsp butter
1/3 cup orange marmalade
1/4 cup balsamic vinegar
1/2 cup chicken stock
2 tbsp honey
a Squeeze of lemon juice
2 scallions, whites and greens, finely chopped

Directions:

In a large pan, heat the olive oil over medium-high to high heat. Chop the chicken into bite sized pieces, season with salt, pepper and poultry seasoning. Then coat with 2 tbsp of flour and shake off the excess.
 
When the oil is hot and ripples, add the chicken and brown for 5 minutes, then turn and sprinkle with rosemary. Cook until the chicken is cooked through, about 5 minutes more. Set aside on a plate.

In a 2 cup measuring cup, stir together the marmalade, vinegar and stock. Put the butter into the wok to melt, then sprinkle the last tbsp of flour to make a roux. Once it bubbles a bit, add the stock mixture. Whisk for 2 to 3 minutes or until the sauce has thickened and becomes a thin glaze. Stir in the honey and lemon juice and whick until blended.

Garnish with green onion. Serve with brown or white rice and a green veggie like zucchini or broccoli. Rachael ray says to top it with Arugula, which I am sure would be good, too.

I would advise that this be eaten up the night you make it. The leftovers weren't as good, in my opinion... but if you like re-heated chinese food, then I'm sure this will be perfect for you.

Saturday, October 15, 2011

Skinny Sesame Peanut Noodles


Here is another delicious recipe from Cook Yourself Thin, my go-to low calorie cookbook. These Asian inspired noodles are cool and refreshing with layers of flavor from some peanut butter, fresh ginger and sesame oil. It also has a great balance of textures: you get the silkiness of the dressing and soft noodles plus a kicky crunch from the peppers, apple and jicama.

I debated reporting about this recipe on the blog. These noodles were super tasty and received rave reviews from my friends who ate it, but it was a little time consuming and I felt like it dirtied a LOT of dishes. Another gripe I had was the fact that you just need a little bit of each ingredient. You end up with a half used jicama, part of an apple, half a head of cabbage, half of a bell pepper. You get the idea, but I like recipes that use up the whole ingredient. This would be even worse if you were to half the recipe. Next time I will just use up the pepper, apple and jicama making it a little more bulky with produce instead of mainly noodles.

This is a great summer meal... even though it's October, it's still feeling like summer here in California.

The recipe:

8 oz whole wheat spaghetti (or Soba noodles if you want to go gluten free and nix the soy sauce)

for the dressing:
2 tbsp rice vinegar
1/4 c. low soduim soy sauce
1/4 c. natural peanut butter
2 tbsp grated ginger
1 tbsp sesame oil
1 tbsp dark brown sugar
the juice of 1 lime
1/2 c. hot water

assembly:
1/2 bag of store-bought coleslaw mix (or just 2 cups shredded cabbage)
1/2 c. red bell pepper, sliced thinly
1/2 c. cilantro, chopped
1/2 c. apple, sliced thinly
1/2 c. jicama, sliced or cubed
1/2 a lime, squeezed
1 tbsp sesame seeds, toasted
2 scallions, sliced

garnish:
dry roasted peanuts
more cilantro
Sriracha if desired

Directions:
Boil the pasta according to the package instructions. Drain and run under cold water. Set aside.

For the dressing, combine all ingredients in a small bowl and whisk until blended. Add to the drained and cooled pasta and toss.

Toss in all remaining ingredients and squeeze the lime juice over the top. Refrigerate for at least an hour. Serve cold. Garnish with peanuts and more cilantro if desired.I had some "5 Alarm" spicy peanuts which were perfect here. I also added a little Sriracha to give it more of a kick.

Serves 6 with 308 calories per serving.

Wednesday, October 5, 2011

Easy Peasy Baby Blankets

If you ever need a superquick baby shower gift, or simply want to make something handmade that will be well used and well loved, make a couple of these blankets.


You need 2 yards of coordinating fabric, 1 in each print. I like to use flannel or fleece so they are nice and soft against baby's skin.


Press the fabric and then pin them together right sides facing each other. Sew with 1/4 inch seam allowance on all 4 sides, leaving a 6 inch gap on the last side. Turn right side out through the gap you left, then turn the open edges in (you can press the fold in to help it to stay) and then top stitch to close with a coordinating thread, continuing the stitch all the way around. Done and done.

I like to use a zigzag stitch to make it a little more visually interesting. This top stitch also helps the layers to not shift around when washed.


These blankets are great for swaddling since they are so big but not too bulky, and they can be used as baby grows..

They can be rolled up and thrown in a diaper bag as a just-in-case-it-gets-cold blanket, spread out on the grass as a play mat and maybe even turn out to be the famed balankey that the child still favors when they are an adult five or six years old.


Easy Peasy, right?

These are all examples of blankets I've made in the past few months- the monkeys were for my cousin Annette and her baby boy, Alex. The orange medallions with the tan backing was for my sister-in-law, Paige and her baby girl, Hadley. The birdies with the yellow backing were for my friend Karen and her baby girl who is due on 11/11/11.

Wednesday, September 14, 2011

Makeover (x2)

 My amazing husband and I are coming up on our two year wedding anniversary! It's pretty hard to believe... It feels like it has only been a few months since we took our vows and celebrated the night away with our friends and family. A few months after the getting married, we read one of Dave Ramsey's books and decided to make a few changes in the way we were going to approach our finances.... well, at this point it was a matter of deciding how to handle our finances now that we were no longer two people living our separate lives, but one family working toward our future together. One of these changes entailed us moving out of my beloved condo and moving into his.


We weren't sure how long we were going to be living here, so for the first year or so I just left things as they were decor-wise. We did do a few basic upgrades like new carpet and new flooring in the kitchen, but as far as the little things, I just wasn't too concerned with changing them.


We've been here for a year and a half now, and as we plug away on our Total Money Makeover, following the motto "If you will live like no one else, later you get to live like no one else" we're doing our best to stick through these years of living in a condo when we'd rather be in a house. Doing coin-op laundry when we'd rather have a laundry room and planting our garden in a raised bed on the patio when we'd like to have a huge amazing garden in a backyard.


“The cause of most of man's unhappiness is sacrificing what he wants most for what he wants now.”
Gordon B. Hinckley
 
We are sucking it up now, though I like to think of it as being content in all circumstances, so that we can have what we truly want later. It's about not over extending ourselves now, even if we reeeeeeally want something, so we will be able to live comfortably without money worries later in life. It's not really a concept I was taught growing up since I pretty much always had what I wanted, and it is definitely counter to the instant gratification society we live in today. It is not easy. I am constantly battling the feeling that I "deserve" the things I want because I work hard. The mentality of entitlement is everywhere, and it's difficult to loosen it's grip. I highly reccomend the Total Money Makeover to anyone and everyone. Seriously.


All of that to say that after 18 months of looking at the black and white framed print of "guy on motorcycle" that hung on the wall in our little dining nook, I was beginning to not even notice him. He's pretty cool, maybe just not really fitting for that area anymore. We needed some photos of family and friends and a little warmth in the lighting department.


Enter the DIY twine lamp shade. I saw something similar whilst blog-cruising and thought it would be perfect. Off I went to buy supplies and craft away. This is the site I used to get an idea of how to make the twine ball. And then I just had a few photos printed up that I wanted to frame... some from our engagement session with Ashley Maxwell, some from the wedding, and a few of our family and friends. I hunted for cheap frames at thrift stores/Michael's/theDollarTree. I picked varying textures and styles ignoring the color since I was going to spray paint them white anyway.

Above is what it looks like on the dimmer when the rest of the room is dark. And below is what it looked like before. If you can look past my husband and cat (sorry! I didn't take a "before" picture) you can see there was a sort of retro semi-flush mount S shaped track lighting thing going on and then the print I mentioned up before of the motorcycle guy. My sweet awesome husband used to race dirt bikes and has a true love for motorcycles, so this was here when our place used to be just his place.


So with one makeover came another. And I have to say I am very happy with both!

Wednesday, September 7, 2011

Five Spice Turkey Lettuce Wraps


It's hard to get out of the weeknight dinner rut. I find myself making the same favorites over and over. I am pretty much always checking websites and blogs for new recipes, but sometimes it's just easier and safer to stick with what you know how to make and you know will be good ... because we all hate being dissapointed. But every once in a while I find a recipe online that just screams easy and safe but still exciting. This lettuce wrap recipes comes from Cooking Well so it is not only easy, but healthy and low cal. Extra bonus!


You'll need:

1/2 cup brown rice
2 teaspoons sesame oil
1 pound 93%-lean ground turkey
1 tablespoon minced fresh ginger
2 cloves of garlic, minced
1 large red bell pepper, finely diced
1 8-ounce can water chestnuts, rinsed and chopped
1/2 cup reduced-sodium chicken broth
2 tablespoons hoisin sauce
1 teaspoon five-spice powder
1/2 teaspoon salt
2 tablespoons soy sauce
2 heads Iceberg lettuce, leaves separated
1/2 cup chopped fresh cilantro. You can also use basil, mint and/or chives
1 large carrot, shredded
Sriracha if desired

Cook the rice according to package. Set aside once cooked.

Meanwhile, heat the sesame oil in a large nonstick pan over medium-high heat. Add turkey, garlic and ginger; cook, crumbling with a wooden spoon until the turkey is cooked through. Stir in the cooked rice, bell pepper, water chestnuts, chicken broth, hoisin, five-spice powder, soy sauce and salt; cook until heated through and sauce begins to thicken.
Divide lettuce leaves among plates, spoon some of the turkey mixture into each leaf, top with herbs and carrot and a squeeze of sriracha if you like it spicy.

Serves 4 with about 1 1/4 cups of filling each.
285 calories per serving.

This is the kind of dinner that leaves you feeling satisfied but not stuffed. It's also a good idea for low carbers out there- you can just omit the rice.

Thursday, September 1, 2011

#winning!

Last night I met up with my book club in San Francisco. We use the term "book club" loosely as it usually involves about 5-7 minutes of discussing the book and about 3 hours of drinking champagne, eating and talking about any or all of the following: how our days went, plans for the weekend, Real Housewives, celebrities, Hunger Games, our husbands/fiancés/boyfriends, current events, other books we should read, and how much or how little of the color white a dress needs to have to be appropriate attire for a wedding. Everyone (usually) reads the book, but there are often way more interesting things to talk about, obviously.


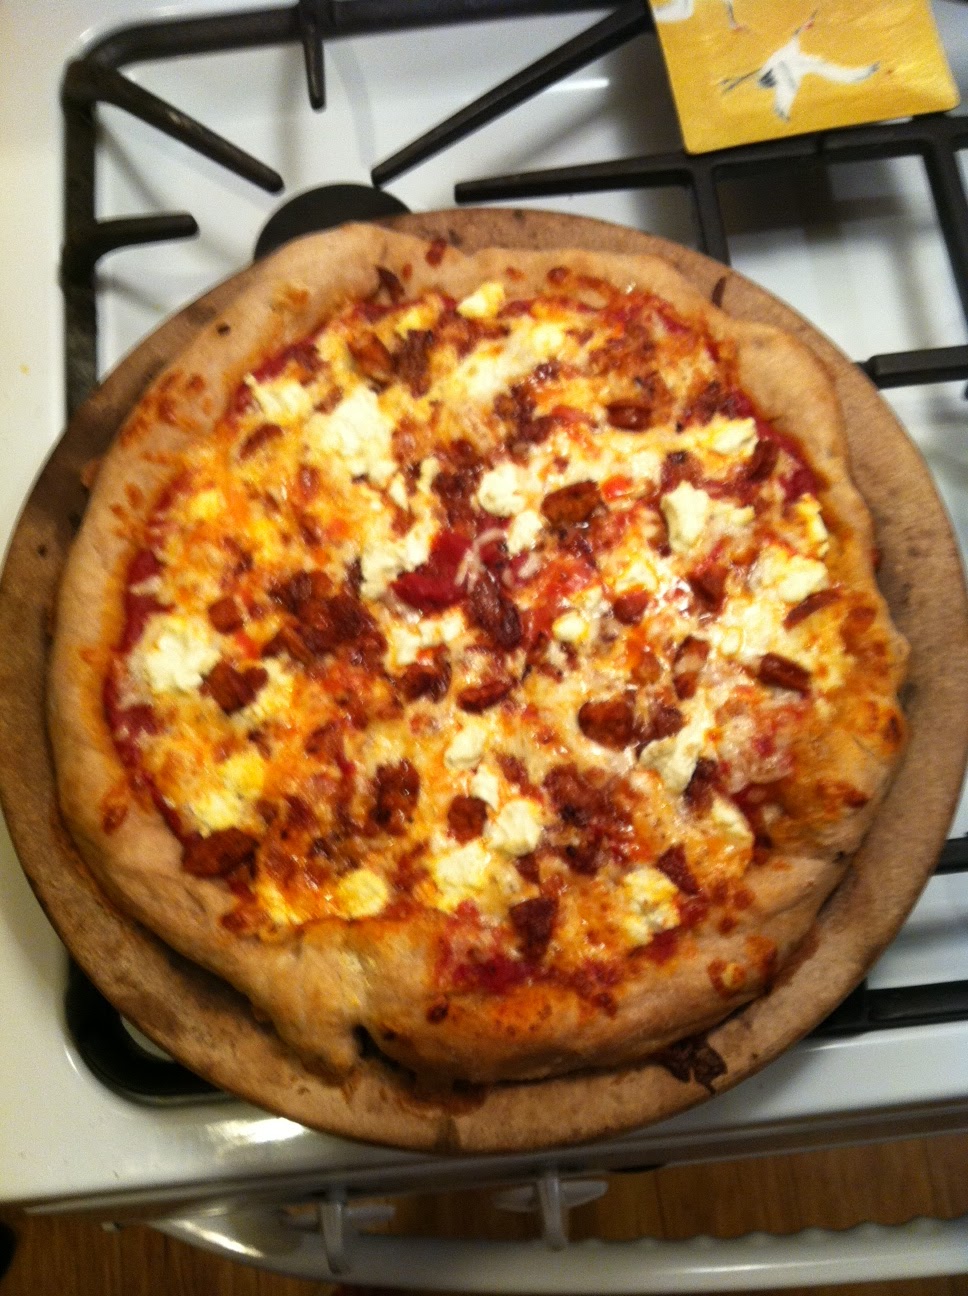
Kelsey hosted, and in usual Kelsey fashion she decided to throw a wrench in the plan by turning dinner into an Iron Chef style competition, complete with a surprise ingredient. She provided all of the elements needed for making pizza. Mar, Christina, Serene and Lyndi volunteered to be judges, vowing to be unbiased. Names were drawn from a hat to determine the two-person teams. Names were drawn again to determine which team got which type of crust: wheat, white or herb, and once more for who would have the advantage of using the pizza stone. Plans were whispered, wine was poured and NewVillager was put on the stereo...


 the judges

My name was drawn to be teamed up with Carol and we were initially told that it was an unfair pairing. Words like “power couple” were used. I think I heard someone murmur something about Martha Stewart and Julia Child. Exaggerating? Maybe. But the results speak for themselves… We won. Unanimously. So after a few minutes of basking in the glory of our triumph, we shamelessly asked what it was about our pizza that set it apart? Three words: Fresh Arugula Drizzle. Mid-competition when the surprise ingredient was introduced… Arugula!! … Carol opined that we should lightly dress the peppery leaves with balsamic and olive oil, then pile it atop the pizza after it was baked. I agreed. Then I pitched the idea of a light drizzle of garlic and basil infused olive oil on top of the plated slices after they had been served to the judges (I had just read this post from Smitten Kitchen earlier that day). Said combo of Arugula and oil drizzle scored big in the categories of presentation, drama and taste.

#winning!


Sadly, we did not get a picture of our finished product, it was eaten up so fast. But here's the beautiful runner up!

Wednesday, August 3, 2011

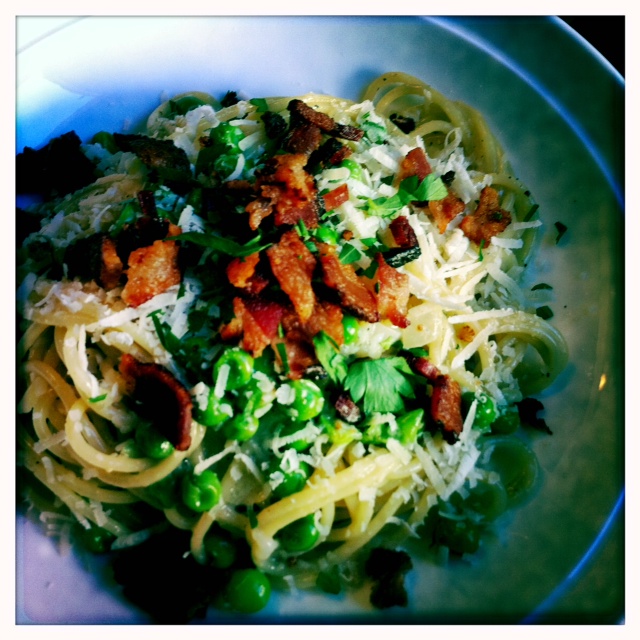
Skinny Spaghetti Carbonara


I am not a traditionalist when it comes to food. You’d think because I lived and basically started my cooking life France, I would be… but I’m not. Unless I'm making something specific, for a special event, I do not take any recipe too seriously. I like to change them up, make them my own. Usually out of a sense of frugality, I like to use what I have on hand. And out of a childhood watching my mom throw this and that into a pot without ever really referencing a recipe, I find myself doing the same.
I know that many people might be offended when I call this Spaghetti Carbonara, when it has a few non-traditional ingredients. But what else can you call it? Carbonara-ish? I just call it “Skinny Carbonara” because it comes from one of my low-calorie cookbooks called Cook Yourself Thin: Skinny meals you can make in minutes.

I was introduced to Carbonara when I was living in France, and ever since then it has been one of those foods that sort of transports me back. It is warm and salty, creamy and comforting. This recipe is just as much of all of these things, but manages to do it in under 450 calories per serving. This is definitely on the dinner rotation at our house. Especially since we're T minus 19 days until our Lake Tulloch trip where we basically live in bathing suits 18 hours a day.

The recipe actually calls for 3 slices of bacon, but since it makes 4 servings, I usually do 4 slices. With one slice of bacon coming in at 70-100 calories adding one more only bumps the calorie count by 25 calories per serving. The 425 count includes the 4th slice.


Spaghetti Carbonara, adapted from Cook Yourself Thin
Serves 4
Calories per serving: 425

Ingredients:
4 slices of bacon
1 teaspoon olive oil
1 small onion, diced
1/3 cup 1% milk
1 large egg
8 ounces of spaghetti
1 cup frozen peas
1.5 ounces parmesan cheese, finely grated
4 tablespoons chopped flat leaf parsley
salt & pepper to taste

1. Cook the bacon in a large skillet over medium heat until brown and crisp. I like to slice it into lardons before cooking. Move to a paper towel and drain the bacon grease. Add the olive oil to the pan and then add the onion, stirring occasionally until soft and translucent. Remove from the heat.

2. In a large serving bowl, whisk together the milk and egg, then stir in the onion. Add a few grinds of black pepper and stir.

3. Bring a large pot of salted water to a boil. Cook spaghetti according to the package instructions. Two minutes before the spaghetti is done, add the peas. Drain the spaghetti and peas, reserving a half cup of the pasta water. Add the pasta/peas to the egg mixture, tossing until the pasta is well coated. I like to add in about a quarter cup of pasta water to give it a little body. Add the cheese, half of the parsley, salt and more pepper to taste.

4. Plate up the pasta, top with crumbles of bacon and garnish with parsley. Serve immediately.

Remember not to put the pot back on a burner once the egg mixture is in there. You dont want scrambled egg spaghetti. Also, something to be aware of: this recipe is best with regular pasta since whole wheat competes with the taste of the sauce.

Buon Appetito!