Thursday, October 28, 2010

Oatmeal Sandwich Bread

The first time I remember baking bread from scratch was when I was living in Toulouse. I somehow got my hands on a copy of Jamie Oliver's "Happy Days With the Naked Chef" and found myself drawn again and again to two recipes. One was a to-die-for Steak Marsala that I ended up making quite often, the other was his basic bread recipe.


If you've seen Jamie you know he has a very... how should I say... free spirited approach to cooking. Little of this, little of that... I just picked this from my garden so I'll add that. You get the idea. I saw a photo in 'Happy Days' which showed a giant mound of flour on a table. You make a well in the center and add the wet ingredients. Start stirring with your finger and you'll gradually draw in the flour from the walls of the well. Keep stirring until it seems like a good dough consistency and then kneed.


Now despite the fact that I could literally throw a tennis ball from the balcony of my flat and hit the front door of my Boulangerie, I decided now would be a good time to start baking bread. So I baked ... and it was amazing. I had never realized how great a reward for such little effort that results from baking bread at home. I just don't think I ever thought about it until seeing that pile of flour in Jamie's cookbook.


I've since tried a few different bread recipes with great success. The one kind I was afraid to try was sandwich bread. This may sound weird, but the biggest uncertainty for me was how to slice it. Here you are being a home baker; you create this great loaf of bread and then you must slice it... Doom and gloom spelled all  over it. You need slices that are not too thick to where all you taste is bread and nothing of what is inside, but not too thin so it tears or breaks or gets soggy. You also need an even hand so the slice is uniform from one end to the other. Sounds like a lame fear, I know. I guess it's the perfectionist in me.


So as my husband says, "Ain't nothin' to it but to do it". I took that to heart, channeled Jamie Oliver and decided to just go for it. I make Scott a sandwich every day for lunch, why not make it completely and totally homemade and bake the bread myself too?


This recipe calls for whole wheat flour, bread flour and oats. A little molasses, some butter and salt and you've got a great hearty sandwich bread that has character and depth, but doesn't take anything away from whatever's on the inside.


Let it rise twice, once in an oiled bowl and once more in the loaf pan you'll bake it in. Whatever you do, do not decide during the second rise that you really must go out to dinner (you'll just bake the bread when you get back!) You'll come home to a Stay Puft Marshmallow Man of a loaf growing and overflowing out of the pan and on to your counter. But if you do, not to worry. Punch it down again, let is rise once more and then bake. I don't know this from experience or anything.....


This is so easy I don't know why I let my fear of uneven slices stop me from trying. If you eat sandwiches, I highly recommend making this bread. Even if you eat toast, or bread and butter with your soup, or if you like french toast, or homemade croutons! Whatever! Just try this bread. It's so worth it.


Lay the cooled loaf on its side. Use a serrated knife and slice with long even strokes. Practice makes perfect!
This was breakfast for my husband this morning- a toasted slice of Oatmeal Bread with scrambled egg and cheddar cheese. Move over Wheaties, this is the breakfast of champions!


The recipe I used is based off a recipe in Good to the Grain by Kim Boyce and Amy Scattergood. I found it via Orangette.

Oatmeal Sandwich Bread

1 package active dry yeast
3 Tbsp. unsulphured (not blackstrap) molasses
2 ½ cups whole wheat flour
2 cups bread flour
1 cup rolled oats
4 Tbsp. unsalted butter, melted and cooled slightly
2 ½  tsp. table salt

Grease a large bowl and a loaf pan with butter or cooking spray.

In the bowl of a stand mixer, combine 2 cups warm water, the yeast, and molasses. Stir briefly, and then allow the yeast to bloom for about 5 minutes. Add the flours, oats, and butter, and stir to mix. The dough will look rough and shaggy. Cover with a towel, and let stand in the bowl of the mixer for 30 minutes.

After 30 minutes, add the salt, and mix on medium speed for 6 minutes. The dough should come together around the hook and slap around the sides of the bowl without sticking. If the dough is sticking, add a tablespoon or two of bread flour, sprinkling it down between the dough and the sides of the bowl. If you don't have a stand mixer, you can knead by hand for about 15 minutes, adding flour as needed. The dough should be soft and supple and slightly sticky.

For the first rise, scrape the dough onto a lightly floured work surface and knead it a few times. Put the dough into the greased bowl, cover with a towel, and leave it to rise for about 1 hour, or until it is doubled in size. To see if it’s ready, gently push a floured finger into it. If the dough springs back, it needs more time; if the dimple remains, it’s ready for the next step.

To shape the dough, scrape it onto a floured work surface. Press down on it, working it into a square shape, taking care to depress any bubbles. Fold the dough down from the top to the middle, then up from the bottom to the middle. Next, bring the newly formed top and bottom edges together, pinching the seam to seal. Pinch the sides together, and roll the shaped dough back and forth, plumping it so that it’s evenly formed and about the size of your pan. Place the dough in the pan with the seam side down, and press it gently into the corners of the pan.

For the second rise, cover the dough with a towel, and let it rest in a warm place for about 1 hour, or until the dough rises to half again its size. While the dough is rising, preheat the oven to 400°F.

When the dough has finished its second rise, bake for about 40 minutes, rotating the pan halfway through. The loaf is ready when the top crust and bottom crusts are nicely browned. To see if the bread is ready, give the top of the loaf a thump with your hand. If it sounds hollow, it’s ready; if not, give it another few minutes in the oven. Remove the finished loaf from the pan and cool completely on a wire rack. Do not cut into it until it is fully cooled.

Friday, October 15, 2010

Cocktail Foods

I don't know about you but I get a little snacky when I am enjoying an adult beverage or two. Tonight is Wine Night, hosted monthly by my sister's friend, Stephanie. The girls get together, drink some wine and catch up with each other. I thought this would be the perfect time to try a few recipes out of my newest cookbook (I'm sure I've already told you about my not-so-secret obsession with cookbooks). It is called "Cocktail Food 50 finger foods with attitude".

I decided to make "Sinful Spuds" and "Pepperoni Pinwheels".... not for any reason other than the fact that I had the majority of the ingredients for both on hand already.

First I made the Sinful Spuds:

New Potatoes stuffed with feta, green olives and pine nuts.

You'll need:

12 small new potatoes
salt
1/2 cup feta
1/4 cup toasted pine nuts
2 tbs chopped green olives
1 tbs olive oil
1 tbs dried currants
1/2 tsp chopped lemon zest
1/4 tsp oregano
24 parsley leaves for garnish

Cut a think slice off the top and bottom of each potato. Then cut in half crosswise. Bring 6 cups of water to a boil, add 1.5 tsp salt. Add potatoes and simmer until fork tender, 10-15 minutes. Be careful not to overcook. Strain and let cool.


In a bowl, crumble the feta. Add pint nuts, olives, olive oil, currants, lemon zest, oregano and pepper. Mix well.


To assemble: Scoop out the center of each potato with a melon baller. Fill the centers with the feta mixture. Garnish with a parsley leaf.


Up next: Pepperoni Pinwheels...


Puff pastry with pepperoni, gruyere and honey mustard....

You'll need:

1/2 cup finely grated Gruyere cheese
3/4 tsp dried sage
3/4 tsp dried oregano
1/4 tsp black pepper
1 puff pastry sheet, thawed
2 tbs honey mustard
2 oz. packaged sliced pepperoni
1 egg, lightly beaten

Mix the gruyere, sage, oregano and pepper in a small bowl. Lay the puff pastry on a lightly floured surface with the short side closest to you. Cut in half crosswise. ** Here the recipe calls for you to arrange with the long side closest to you, but I didnt think my pastry would be long enough to roll over more than twice, so I did short side closest to me.**

Put 1 tbs mustard on each piece of pastry and spread evenly leaving 1 inch on the farthest edge from you. Arrange the pepperoni in a single layer on top of the mustard. The sprinkle the cheese mixture on top of the pepperoni.


Brush the farthest edge with the egg. Roll the puff pastry tightly from the closest edge toward the egg coated edge. Lay seam side down on a cookie sheet and refrigerate for 30 minutes. ** You can do everything up until here up to 1 day in advance. Just keep the rolls refrigerated and covered.**.

Preheat oven to 400. Slice the logs into 1/4 inch thick slices and lay on a parchment lined baking sheet about 1 inch apart.


Bake in the center of the oven, 1 sheet at a time until they are golden brown, about 14 minutes. Serve warm.


Next time you have a few friends over for some cocktails, try one of these recipes! The perfect finger food to accompany your adult beverage :)

Saturday, October 9, 2010

Wish List: Bomber Jacket


So I know my blog is about 'new creations' and I definitely didn't sew this amazing bomber jacket... but it was just way too cool to pass up posting a picture! Isn't it beautiful?

I was on the Filson website checking out a coat that my husband has been drooling over and meandered on over to the women's section. Much of their stuff is for rugged outdoors men and women (you can shop by activity: everyday, hunting, shooting, fly fishing!?) but this jacket caught my eye. Looks warm enough for a horseback ride in Montana in the winter, but chic enough for a dinner date with the hubs. I would probably use it more often for the latter of the two :)

Friday, September 24, 2010

Dulce de Leche Brownies


This is another great recipe from David Lebovitz. I check his blog often because he has awesome dessert recipes... and because he lives in France... and I love all things French! It has been almost 10 years since I lived there, and I feel like reading his blog keeps me in touch with la vie fran
รงaise. I like that. He also travels quite a bit so reading his stories about places he visits is inspiring to me.

** Side note if you're into farmers markets: He recently posted about his visit to Cork, Ireland. He details his experience at their farmers market. Here's the link if you want some good reading.

David's recipe for Dulce de Leche Brownies:

8 tablespoons butter cut into pieces
6 ounces bittersweet or semisweet chocolate, finely chopped
1/4 cup unsweetened Dutch-process cocoa powder
3 large eggs
1 cup sugar
1 teaspoon vanilla extract
1 cup flour
1 cup Dulce de Leche (or Cajeta)

Preheat the oven to 350 degrees.

Line a 8-inch square pan with a long sheet of non-stick aluminum foil that covers the bottom and reaches up the sides. If you don't have non-stick foil, grease the bottom and sides of the foil with a bit of butter or non-stick spray.
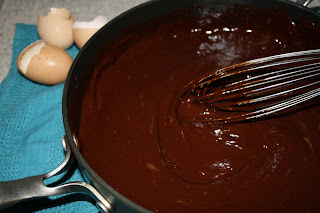
Melt the butter in a medium saucepan.


Add the chocolate pieces and stir constantly over very low heat until the chocolate is melted.


Remove from heat and whisk in the cocoa powder until smooth. Add in the eggs one at a time, then stir in the sugar, vanilla, then the flour.


Now comes the dulce de leche part.... you can probably find canned dulce de leche in the grocery store, but if you can't, follow David's recipe for making your own. I am sure its worth it. In a pinch, the canned stuff is perfect. I found it right next to the sweetened condensed milk at the grocery store. This is what it looks like:


Scrape half of the batter into the prepared pan. Drop one-third of the Dulce de Leche, evenly spaced, over the brownie batter, then drag a knife through to swirl it slightly. Spread the remaining brownie batter over, then drop spoonfuls of the remaining Dulce de Leche in dollops over the top of the brownie batter. Use a knife to swirl the Dulce de Leche slightly.


Bake for 35 to 45 minutes. The brownies are done when the center feels just-slightly firm. Remove from the oven and cool completely.
These brownies actually become better the second day, and will keep well for 3-4 days.

I don't have a photo of the cooked brownies. Their yumminess took over my ability to have a rational thought :(


Sunday, September 19, 2010

Graphic Onesies : Tutorial


Have you ever thought to yourself, "I could make that!" and then you try, and it's really not as good as you expected it to be?

I did that around this time last year with a necktie onesie for my sister in law. I free-handed a little pattern in the shape of a necktie and just sewed it right on there. It was cute, but not nearly as cute/perfect/professional as the one I recently found on Crap I've Made (which I really found via Big Sis Lil Sis -- thank you Erica!)

So when I needed a quick baby shower gift for one of the girls in my small group, Esther, I gave the ole necktie onesie another shot. And also tried the cute rocket graphic from Crap I've Made.


Here is a quick run down of how it's done:

Get a scrap of fabric you like, you don't need much. I used this black & gray paisley.


Iron a piece of Wonder Under to the scrap.


Peel the paper off and trace the pattern onto the fabric.


Cut your pieces out.

Place the knot onto your onesie, making sure its centered.


Slip the tail of the tie under the knot and iron in place.


Wonder Under is supposed to keep the fabric in place, even through washings, but I like the look of a little topstitch all the way around.


For the matching burp cloth, measure your trifold cloth diaper (mine was about 14 inches wide). Cut a strip of fabric 15x5. Tuck under 1/2 inch on each side and pin in place. Topstitch around all 4 sides. Repeat for the other end.

I recommend using white bobbin thread so the stitches are less noticeable on the underside.


There you have it! A matching onesie / burp cloth set.


Package up with a little gift card and you have the perfect shower gift!

Strawberry Jam


Some of you guys know that my husband and I live somewhat in the hood. We joke and call it the hood, but really, it is a very family oriented (and very food oriented) neighborhood. We have a regular ice cream truck that comes by just before the sun sets, we have the Mexican bread man who wheels his card by in the afternoons selling delicious baked goods. And every few days in the summer we have people come to the door selling flats of strawberries. I was home early from work last week when the strawberry guy came by. $7 for a flat of strawberries?? YES. Could my husband and I have eaten all 8 baskets of strawberries before they went bad? Probably not.


Next best thing? Jam.

This recipe is from the Ball Blue Book Guide to Preserving I got at the local hardware store for about $8. It has recipes for anything you could ever possibly can or preserve.

Strawberry Jam:

2 quarts strawberries
1 package powdered pectin
1/4 cup lemon juice
7 cups sugar


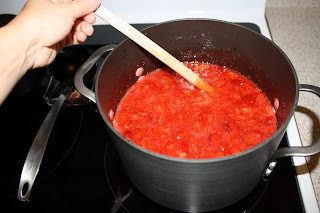
Wash strawberries; drain. Remove stems. Crush strawberries one layer at a time.


Combine strawberries, powdered pectin and lemon juice in a large saucepot.


Bring to a boil, stirring occasionally. Add sugar, stirring until dissolved. Return to a rolling boil. Boil hard 1 minute, stirring constantly.


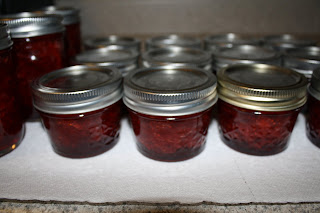
Remove from heat. Skim foam if necessary. Ladle hot jam into jars leaving 1/4 inch head space.


Adjust 2 piece caps (lid and ring) finger tighten the ring and let them sit on the counter undisturbed for 24 hours. You should hear the lids start to pop within a few minutes. This means they are sealing. Any jam recipe will call for you to process the jars for 10 minutes in boiling water. This is to ensure that they seal, but I have always found that they seal just fine without the boiling water bath. You can do it if you choose.


Make some cute labels and give them out to your friends and family.

There is something super satisfying about a PB&J with jam you made from scratch :)

Just a few notes here for anyone wanting to make their own jam:

~Most people sterilize their jars the traditional way by boiling them. You need to have clean jars for obvious reasons, and you need to have hot jars to prevent the glass from being shocked by the hot liquid and breaking. I like to run mine through the dishwasher and run the heated dry. This cleans them and gets them nice and hot. You can do it either way.

~When crushing the strawberries, you think you need to mush them up a lot, try to refrain; the chunks will break up once you boil the mixture.

~The insert says that you can add a little bit of butter to reduce foaming. I would suggest doing the butter. I didn't this time and I had a lot of foam. You don't want foam in your jam.

~ Last thing to remember about making jam- preparation is EVERYTHING. Make sure you read the recipe through a few times, have everything you need ready to go before you start. It is also way convenient to have an extra set of hands to do the lids while you ladle.

Have fun and enjoy the fruits of your labor!

Friday, September 17, 2010

My new go-to cookie!!

Peanut Butter Cup Cookies!!


When I need a quick batch of cookies for a party or just to satisfy a sudden sweet tooth, I usually fall back on the tried and true chocolate chip cookie. But when I had a Costco sized container of peanut butter on hand leftover from a camping trip, I started thinking of ways to chocolateize (yes, I just made that word up) the usual peanut butter cookie.

These are a total hit everywhere I bring them. As you can see from my pictures, I also used Hershey's Kisses because I wasn't sure if people would be put off by too much peanut butter on peanut butter action. Can you ever have too much peanut butter? Apparently not, because there are always leftovers of the Kiss ones, and none of the peanut butter cup ones.

Here's the recipe, it's from www.Cooks.com:

**One item of special equipment that will be needed: small tart tins / mini muffin tins.

1/2 c. butter
1/2 c. peanut butter
1/2 c. packed brown sugar
1/2 c. granulated sugar
1 egg
1/2 tsp. vanilla
1 1/2 c. flour
3/4 tsp. baking powder
1/2 tsp. salt
1 bag Reese's small peanut butter cups


Chill the peanut butter cups for a few minutes in the freezer, then unwrap. It works best when the cups are cold, the wrappers don't take any chocolate with them. Set unwrapped cups aside.

Cream butter, peanut butter and sugars. Beat in egg and vanilla. Add flour & baking soda to creamed mixture. Mix until a nice dough forms. Shape into 1 inch balls and put in ungreased small tart tins. Do not spread dough in cups, but feel free to press them down a little bit. Bake at 375 degrees for 8-10 minutes. Look for the cracks in the cookie to know when they're done. Remove from oven and immediately press peanut butter cup into center. Let cool in tins for 15 minutes and remove. Be careful when storing, the chocolate will remain melty for a while.

Makes 48-50 cookies.


You will be eating these by the half dozen, guaranteed.