Wednesday, November 24, 2010

Buckeyes!

I have never heard of these cookies (or are they candy?) in my entire life. Initially I thought they were called Buckeyes because they look like an eyeball. Sort of gross... and sort of true in  a round about way. They are named after the Buckeye nut, which got it's name from the Native Americans who thought the nut looked like the eye of male deer. The nut comes from a tree that is native to Ohio..... hence Ohio being the Buckeye State and the Buckeye being the mascot for Ohio State University.


If you do a Google Image search for the Buckeye Nut, you'll see that these cookies look exactly like the nut of the same name (although I didn't coat mine high enough up the sides for them to really look like the nut). See the notes below on a trick for getting the coating up the sides without losing the ball in the chocolate bath.

My apologies for the boring history lesson. I hope I kept it short enough so that you didn't just scroll down to the bottom to get straight to the recipe :)


 I have been on the hunt for a recipe that contains graham crackers... But it can't be just any recipe; the graham crackers need to somehow be formed into a little ball and coated with chocolate. There is a very specific purpose for this, but I have to keep it under wraps until after December 18th. Check back after then for a recipe that will be the MVP of your next camping trip. Anyhow, I found this recipe when I googled "Graham Cracker Balls". Perfect!


I decided to try these as a trial run for the above mentioned Top Secret recipe and really liked the way they turned out. They are simple to make and soooo tasty. I had to give the majority of them to my husband to take to work with him, fearing that I would devour all of them and wake up 10 lbs heavier. Yikes.


Follow the easy-peasy recipe below. I learned a few things along the way that might be helpful:
  1. Don't leave any big chunks of walnuts or graham crackers. If you can use a food processor or mini-prep, do it. The finer the crumb, the better the balls will stick together.
  2. Add half the graham cracker crumbs and stir the mixture. If its too sticky add more. You don't want it to be overly dry.
  3. Use a toothpick or fondue fork to dip. If you don't want the hole from the toothpick showing at the top, stick the poker in the side and tilt the bowl of chocolate, submerging the ball until just a small circle is uncoated at the top. Submerge the part when the toothpick is poked in, that way you don't have to patch up the hole. I will do this next time I make these... I put the pick in at the top and was having a hard time submerging the whole thing without it getting stuck and the pick slipping out when I removed them from the choco-bath.
  4. I used crunchy peanut butter but will try smooth next time for a less chunky end result.
  5. If you don't like coconut, you can leave it out. I would try and add 1/4 cup of cream cheese to bring a little more depth of flavor. Other recipes I have found call for cream cheese. Sounds good to me!


Buckeyes
Adapted from Zandria’s Mom’s Graham Cracker Balls

1/2 - 2/3 box graham crackers, crushed into a fine crumb
1 cup walnuts, chopped finely
1 cup peanut butter
8 oz. shredded coconut
2 sticks butter, melted
1 lb. confectioners sugar
2 tsp. vanilla
 
1 bag semi-sweet chocolate chips


Mix all ingredients except the chocolate chips together in a stand mixer until smooth. Scoop out a heaping tablespoon of dough and roll into a ball. Place rolled balls onto a cookie sheet lined with parchment or wax paper.

Melt the chocolate in a double boiler, or by heating in the microwave for 30 seconds and then in 10 second increments until smooth, stirring in between each heating.

Using a toothpick or skewer, coat each ball with chocolate and place on the cookie sheet. Chill for 30 minutes for the chocolate to set.

Yields about 60 balls, depending on the size. They will keep for 3-4 days, or up to a week in the fridge.


Remember to check back after December 18th for a variation of the Buckeye that will be sure to blow your mind :)

Sunday, November 7, 2010

Salted Pumpkin Caramels


Fall is by far my favorite season. Especially here in California where you get those bright, sunshine filled days when the air is crisp and cool. It's like Fall combines the best parts of all of the other seasons- summery sun, cool winter temps and spring fresh air. My favorite holiday is also in the Fall. That magical day filled with family and friends, turkey and cranberries, parades and football on TV.

When it comes to Thanksgiving dessert, I have always been a Pecan Tart kind of girl. I like Pumpkin Pie, but never really get excited about it, if you know what I mean. I recently found a recipe that gives life to your old can of pumpkin puree. Salted Pumpkin Caramels. Now these I can get excited about.


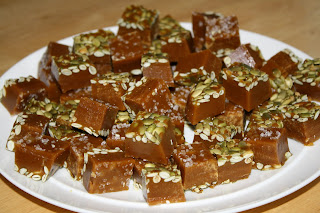
The recipe calls for your standard caramel ingredients of sugar, corn syrup and butter and throws in some extra Thanksgiving-ish ones like pumpkin puree, pumpkin pie spice and maple syrup. For a little festive punch, the bottoms of the caramels are lined with pumpkin seeds.


A side note about the pumpkin pie spice: if you don't have any, check your spice rack before buying some. If you have cinnamon, nutmeg, ginger, allspice and ground cloves, you have everything you need. This recipe calls for 1 teaspoon of pumpkin pie spice. Just combine a scant quarter teaspoon of each spice listed above in a small dish. Easy! And it saves you $4.


I have found that the weather has a lot to do with how caramel sets. The temperature and humidity all effect how soft or firm the caramels turn out. You also have to pay close attention to the temperature of the mixture, so make sure you use a candy thermometer.  Bring it up too high and you'll have rock hard caramels. Don't get it hot enough and the caramels wont set. The more you make them, the better you'll get a feel for how to get them just right. It really is more of an art than a science.


Resist the temptation to scrape the sides of the pan when you pour it out. The tiny crystals you scrape off will cause you to have grainy caramel. In the words of Alton Brown: Definitely NOT good eats. I realized this after the fact and had a few pieces that were sugary and grainy :(


 Use a hot knife to cut the slab into equal quadrants. Original recipe states a 64 piece yield which means they will be about 1" cubes. If you're not sure if you're cutting them in the right size, but want uniformity, cut the slab into 4. Then cut each one of those pieces into 4 smaller squares. Each of those smaller squares will then make four 1" cubes. Make sense?


Don't these just look beautiful? So festive, and the pumpkin-y spiciness of it is very Fall :)


Original recipe can be found at Food 52, a new website I recently stumbled upon. From their site description: "At food52, we recognize talented home cooks by giving them a place to show off their work, a place where cooks of all kinds come to be inspired and engaged in lively conversation." How fun!


Salted Pumpkin Caramels (From Cheese1227's recipe posted on Food52)

2/3 cup unsalted pepitos (pumpkin seeds)
1 1/2 cups heavy cream
2/3 cup pumpkin puree
1 teaspoon pumpkin pie spice (see note above if you do not have pumpkin pie spice)
2 cups white sugar
1/2 cups light corn syrup
1/3 cup good maple syrup
1/4 cup of water
4 tablespoons unsalted butter, cut in chunks
1 teaspoon lemon juice
3/4 teaspoon fleur de sel
Directions:

Dry toast the pepitos in a skillet until they start to pop being careful to move them around so they don't burn.

Line the bottom and the sides of an 8-in square pan with parchment. Butter the parchment on the sides of the pan. (I actually didn't line the sides with parchment, I just heavily buttered them.) Evenly spread out the toasted pepitos on the bottom of the pan, on top of the parchment.

In a saucepan, combine heavy cream, pumpkin puree and spices. Warm the mixture, but do not let it boil.

In a second heavy bottomed pan, with sides at least 4 inches high, combine the sugar, both syrups and water. Stir until the sugars are melted, then let it boil until it reaches 244 degrees (the soft ball point on a candy thermometer). Carefully add the cream and pumpkin mixture and slowly bring to 240 degrees on a candy thermometer. Stir frequently and adjust the heat as needed.

As soon as it reaches the 240, pull it off the heat and stir in the butter and lemon juice. Stir vigorously until the butter has melted.

Pour the mixture into the prepared pan. Let cool 30 minutes and sprinkle the salt over the top. Let the caramels fully set (at least 2 hours) before using a hot knife to cut them into 1-inch squares. You can wrap them individually in waxed paper, or arrange on an elegant plate to present at a party. Or just hover over the counter in the kitchen and shovel them directly into your mouth as fast as you can :)


Thursday, November 4, 2010

Broccoli Cheese Soup

I am almost certain this recipe was thought up one night by someone who needed to use up the ingredients that were lingering in the fridge. I believe this because that's exactly what lead me to make this soup on Monday night. I had 3/4 of a package of broccoli florets from Trader Joe's and a motley crew of cheeses, all needing to be consumed asap.

Everyone keeps a few onions on hand, right? You should if you don't. They last a long time if stored properly, not to mention almost every great recipe starts with butter, onions & garlic! The fragrance of those three simple ingredients cooking away in a pan makes me swoon every-single-time. It never fails.


You can use any cheese you have, really. I just used my leftovers from a cheese plate we brought to a friends house. Anything that will melt. I'm sure there are cheeses that go better with broccoli than others, though. Feel free to experiment.


Since I was sort of winging this recipe when I made it, I steamed the broccoli in the stock, then sort of mashed them up with my potato masher. I then added in the onion roux mixture. After looking up a couple of Broccoli Cheese Soup recipes, it seems you can do the roux, whisk in the chicken stock then add the broccoli to that. Cook until tender and then blend. (See Emeril's recipe I link below)


If you don't usually keep chicken stock on hand, I highly recommend these little packets from Trader Joe's. They give you 12 packets to a box, its is basically chicken stock concentrate. Add 1 packet to 1 cup of hot water and voila! The don't take up any space in the pantry and last for a couple years. Like bouillon. Brilliant.


Below is a basic recipe, feel free to experiment with different cheeses and maybe some spices. Emeril has an interesting recipe here that I may try next time.

ANC's Broccoli Cheese Soup

2-3 tablespoons butter
1 cup white or yellow onion, chopped
1/2 teaspoon salt
1/4 teaspoon pepper
1 teaspoon garlic, chopped
3 tablespoons all-purpose flour
3 cups chicken or veggie broth
1 package of broccoli florets (or frozen broccoli)
1/2 cup half and half
3/4 cup Cheddar cheese
3/4 cup Gruyere cheese 

In a large sauce pot bring the chicken stock to a boil. Add the broccoli and cook / steam until tender, for 10 minutes. Once tender, partially mash the florets with a potato masher to break them up.

Meanwhile, in a medium frying pan, melt the 3 tablespoons butter over medium-high heat. Add the onions, salt and pepper and cook until soft. Add the garlic and stir for about 30 seconds. Next add the flour and stir until all of the moisture is soaked up by the flour. Let it cook for a minute or two to eliminate any raw flour taste. Turn off the heat and stir in the half and half.

Add the contents of the frying pan to the pot of broccoli and stir until blended. Remove from the heat and puree with an immersion blender. Add the grated cheese and stir until melted.

Serve warm with bread sticks or crusty french bread.

Perfect for a cool fall evening with the one you love <3