Tuesday, December 21, 2010

Peppermint Bark

I always thought of myself as a dark chocolate kind of girl. I love to savor a small little chunk of super dark right after a meal. (I have this seriously intense chocolate craving the second I finish the last bite of my dinner). Dark chocolate really satisfies the craving and also makes me feel pretty darn good about myself... you know with all of the health giving antioxidants and such.


So anything with white chocolate I tend to think of as "not worth it"... but let me tell you, one little taste of this peppermint bark had my taste buds singing praises to white chocolate... even with it's lack of anti-oxidants. 'Tis the season, right? The silky smooth white blends amazingly with the dark. Add some crunchy freshness with smashed candy cane and you've got the perfect holiday treat.

 
 I had never made any kind of bark before this. My husband is a big fan and wanted to make some (read: he wanted me to make some) for us to give out (read: give out half and gorge ourselves on the other half). So off to the store I went for chocolate and peppermint extract.


We had a GIANT homemade candy cane from one of Scott's co-workers so we used that for our topping. See how big it is? I was a little sad to destroy it, but happy that it went to good use (and a portion of it back to work with Scott)


 I sort of wish I would have made more. I wasn't sure exactly how much the recipe would make, but figured I could always make another batch. 

I am definitely going to make another batch.


 The original recipe calls for the dark chocolate mixture to be melted directly in a saucepan, but mine morphed into some weird chunky slimy glop. It was totally irreversible and I had to toss it. I don't know what happened, but I had enough chocolate and whipping cream to do another batch, which I did with a double boiler and it came out fine. The 3/4 of a teaspoon of Peppermint extract in the dark mixture really gives it that extra punch of minty freshness... like you're in a Peppermint Patty commercial. Really.


So the key is to give each layer a chance to set up completely and have the next layer of melty chocolate be just lukewarm. Spreadable, but not hot enough to start smearing the layer underneath. We want a clean separation of white and dark here.


 I sort of ran out of white chocolate for the top layer. My edges left the layers exposed, but I kind of like the way it looks. Like a peppermint bark pizza!


Trim it up as directed below and package however you wish. These little 4x6 inch "treat bags" from Michael's allowed for the perfect serving size. Not so much that people hate you for single-handedly causing 5 lbs in holiday weight gain. Just enough to make them love you and ask you for the recipe.


Layered Peppermint Bark Crunch
Adapted from Bon Appetit

Makes about 36 pieces

17 ounces good-quality white chocolate
6 ounces coarsely crushed peppermint candies (about12 regular candy canes)
7 ounces bittersweet or semisweet chocolate
6 tablespoons whipping cream
3/4 teaspoon peppermint extract

Line a baking sheet with a silicone baking mat or a sheet of heavy-duty aluminum foil.

Place the white chocolate in a heat proof bowl set over saucepan of barely simmering water to create a double boiler. Stir occasionally until the chocolate is melted and smooth and a candy thermometer registers 110°F. Pour 2/3 cup of the melted white chocolate onto the baking sheet, and using an offset spatula, spread it into about a 9x12-inch rectangle. Sprinkle with 1/4 cup crushed peppermints. Refrigerate until set, about 15 minutes.

Meanwhile, stir together the bittersweet chocolate, cream and peppermint extract in a double boiler or a bowl set over simmering water until just melted and smooth. Cool until it is lukewarm. Pour the dark chocolate mixture in long lines over the white chocolate rectangle. This is important to not melt the white chocolate layer. Using a clean spatula, spread the chocolate in even layer. Refrigerate until very cold and firm, at least 25 minutes.

Rewarm the bowl of white chocolate over barely simmering water again, to 110°F. Working quickly, pour the white chocolate over the firm bittersweet chocolate layer and spread evenly to cover. Immediately sprinkle the remaining crushed candy cane over the surface of the candy. Chill until firm, at least 20 minutes. I left mine in overnight before cutting.

If using a silicone mat, slide a spatula under the slab and move it to a cutting board. If using foil, lift the foil with the bark on it to a cutting board and trim it directly on the foil. Trim the edges of the slab to obtain nice clean edges with the layers visible, then cut the bark into pieces. You can snack on the edge pieces, or if you don't care about having perfect pieces, you can include the edges in your packaged up gift bags.

Can be made 2 weeks ahead and kept in an airtight container in the refrigerator.

Merry Christmas!!

Monday, December 6, 2010

Modern Diaper Bag

A while back I promised my sister I would make her a weekend travel bag. I really liked the way Amy Butler's Weekender Bag was styled, so I bought the pattern, the fabric and all of the other items I would need to get the bag started... Some time passed as I pondered (dreaded) the journey ahead of me. I began procrastinating like I was back in college. I was out partying when I should have been studying for finals.


Searching through Blogland for people who had made the bag before me did not help me to overcome my  tendency toward procrastination. I read post after post after post of people who had put their blood sweat and tears (literally) into the Weekender. I was absolutely intimidated. All the talk of broken needles, layers of cording and the excessive use of their seam rippers had me regretting my promise to my sister. It was a big project, one of the likes I had never attempted before.

So when my sister found out she was pregnant over the summer, I decided she would probably need a diaper bag more than a weekend travel bag (I can almost hear all of you mom's nodding in agreement) and I switched gears a bit. I bought Amy Butler's Little Stitches for Little Ones and after quick flip through the pages I saw the Modern Diaper Bag. I knew Michele would be happy to have that instead. This bag took me about 6 sessions of 4 hours each to complete. There was a lot of cutting, a lot of interfacing and quite a few ripped seams. But all in all, it was totally worth it.

Here she is at her baby shower this past weekend.
I think she loves it.
Can't wait to meet my little nephew, due January 26th, 2011!!

Wednesday, November 24, 2010

Buckeyes!

I have never heard of these cookies (or are they candy?) in my entire life. Initially I thought they were called Buckeyes because they look like an eyeball. Sort of gross... and sort of true in  a round about way. They are named after the Buckeye nut, which got it's name from the Native Americans who thought the nut looked like the eye of male deer. The nut comes from a tree that is native to Ohio..... hence Ohio being the Buckeye State and the Buckeye being the mascot for Ohio State University.


If you do a Google Image search for the Buckeye Nut, you'll see that these cookies look exactly like the nut of the same name (although I didn't coat mine high enough up the sides for them to really look like the nut). See the notes below on a trick for getting the coating up the sides without losing the ball in the chocolate bath.

My apologies for the boring history lesson. I hope I kept it short enough so that you didn't just scroll down to the bottom to get straight to the recipe :)


 I have been on the hunt for a recipe that contains graham crackers... But it can't be just any recipe; the graham crackers need to somehow be formed into a little ball and coated with chocolate. There is a very specific purpose for this, but I have to keep it under wraps until after December 18th. Check back after then for a recipe that will be the MVP of your next camping trip. Anyhow, I found this recipe when I googled "Graham Cracker Balls". Perfect!


I decided to try these as a trial run for the above mentioned Top Secret recipe and really liked the way they turned out. They are simple to make and soooo tasty. I had to give the majority of them to my husband to take to work with him, fearing that I would devour all of them and wake up 10 lbs heavier. Yikes.


Follow the easy-peasy recipe below. I learned a few things along the way that might be helpful:
  1. Don't leave any big chunks of walnuts or graham crackers. If you can use a food processor or mini-prep, do it. The finer the crumb, the better the balls will stick together.
  2. Add half the graham cracker crumbs and stir the mixture. If its too sticky add more. You don't want it to be overly dry.
  3. Use a toothpick or fondue fork to dip. If you don't want the hole from the toothpick showing at the top, stick the poker in the side and tilt the bowl of chocolate, submerging the ball until just a small circle is uncoated at the top. Submerge the part when the toothpick is poked in, that way you don't have to patch up the hole. I will do this next time I make these... I put the pick in at the top and was having a hard time submerging the whole thing without it getting stuck and the pick slipping out when I removed them from the choco-bath.
  4. I used crunchy peanut butter but will try smooth next time for a less chunky end result.
  5. If you don't like coconut, you can leave it out. I would try and add 1/4 cup of cream cheese to bring a little more depth of flavor. Other recipes I have found call for cream cheese. Sounds good to me!


Buckeyes
Adapted from Zandria’s Mom’s Graham Cracker Balls

1/2 - 2/3 box graham crackers, crushed into a fine crumb
1 cup walnuts, chopped finely
1 cup peanut butter
8 oz. shredded coconut
2 sticks butter, melted
1 lb. confectioners sugar
2 tsp. vanilla
 
1 bag semi-sweet chocolate chips


Mix all ingredients except the chocolate chips together in a stand mixer until smooth. Scoop out a heaping tablespoon of dough and roll into a ball. Place rolled balls onto a cookie sheet lined with parchment or wax paper.

Melt the chocolate in a double boiler, or by heating in the microwave for 30 seconds and then in 10 second increments until smooth, stirring in between each heating.

Using a toothpick or skewer, coat each ball with chocolate and place on the cookie sheet. Chill for 30 minutes for the chocolate to set.

Yields about 60 balls, depending on the size. They will keep for 3-4 days, or up to a week in the fridge.


Remember to check back after December 18th for a variation of the Buckeye that will be sure to blow your mind :)

Sunday, November 7, 2010

Salted Pumpkin Caramels


Fall is by far my favorite season. Especially here in California where you get those bright, sunshine filled days when the air is crisp and cool. It's like Fall combines the best parts of all of the other seasons- summery sun, cool winter temps and spring fresh air. My favorite holiday is also in the Fall. That magical day filled with family and friends, turkey and cranberries, parades and football on TV.

When it comes to Thanksgiving dessert, I have always been a Pecan Tart kind of girl. I like Pumpkin Pie, but never really get excited about it, if you know what I mean. I recently found a recipe that gives life to your old can of pumpkin puree. Salted Pumpkin Caramels. Now these I can get excited about.


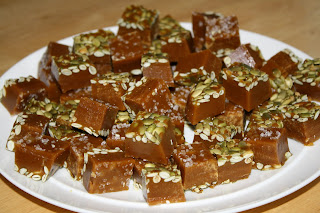
The recipe calls for your standard caramel ingredients of sugar, corn syrup and butter and throws in some extra Thanksgiving-ish ones like pumpkin puree, pumpkin pie spice and maple syrup. For a little festive punch, the bottoms of the caramels are lined with pumpkin seeds.


A side note about the pumpkin pie spice: if you don't have any, check your spice rack before buying some. If you have cinnamon, nutmeg, ginger, allspice and ground cloves, you have everything you need. This recipe calls for 1 teaspoon of pumpkin pie spice. Just combine a scant quarter teaspoon of each spice listed above in a small dish. Easy! And it saves you $4.


I have found that the weather has a lot to do with how caramel sets. The temperature and humidity all effect how soft or firm the caramels turn out. You also have to pay close attention to the temperature of the mixture, so make sure you use a candy thermometer.  Bring it up too high and you'll have rock hard caramels. Don't get it hot enough and the caramels wont set. The more you make them, the better you'll get a feel for how to get them just right. It really is more of an art than a science.


Resist the temptation to scrape the sides of the pan when you pour it out. The tiny crystals you scrape off will cause you to have grainy caramel. In the words of Alton Brown: Definitely NOT good eats. I realized this after the fact and had a few pieces that were sugary and grainy :(


 Use a hot knife to cut the slab into equal quadrants. Original recipe states a 64 piece yield which means they will be about 1" cubes. If you're not sure if you're cutting them in the right size, but want uniformity, cut the slab into 4. Then cut each one of those pieces into 4 smaller squares. Each of those smaller squares will then make four 1" cubes. Make sense?


Don't these just look beautiful? So festive, and the pumpkin-y spiciness of it is very Fall :)


Original recipe can be found at Food 52, a new website I recently stumbled upon. From their site description: "At food52, we recognize talented home cooks by giving them a place to show off their work, a place where cooks of all kinds come to be inspired and engaged in lively conversation." How fun!


Salted Pumpkin Caramels (From Cheese1227's recipe posted on Food52)

2/3 cup unsalted pepitos (pumpkin seeds)
1 1/2 cups heavy cream
2/3 cup pumpkin puree
1 teaspoon pumpkin pie spice (see note above if you do not have pumpkin pie spice)
2 cups white sugar
1/2 cups light corn syrup
1/3 cup good maple syrup
1/4 cup of water
4 tablespoons unsalted butter, cut in chunks
1 teaspoon lemon juice
3/4 teaspoon fleur de sel
Directions:

Dry toast the pepitos in a skillet until they start to pop being careful to move them around so they don't burn.

Line the bottom and the sides of an 8-in square pan with parchment. Butter the parchment on the sides of the pan. (I actually didn't line the sides with parchment, I just heavily buttered them.) Evenly spread out the toasted pepitos on the bottom of the pan, on top of the parchment.

In a saucepan, combine heavy cream, pumpkin puree and spices. Warm the mixture, but do not let it boil.

In a second heavy bottomed pan, with sides at least 4 inches high, combine the sugar, both syrups and water. Stir until the sugars are melted, then let it boil until it reaches 244 degrees (the soft ball point on a candy thermometer). Carefully add the cream and pumpkin mixture and slowly bring to 240 degrees on a candy thermometer. Stir frequently and adjust the heat as needed.

As soon as it reaches the 240, pull it off the heat and stir in the butter and lemon juice. Stir vigorously until the butter has melted.

Pour the mixture into the prepared pan. Let cool 30 minutes and sprinkle the salt over the top. Let the caramels fully set (at least 2 hours) before using a hot knife to cut them into 1-inch squares. You can wrap them individually in waxed paper, or arrange on an elegant plate to present at a party. Or just hover over the counter in the kitchen and shovel them directly into your mouth as fast as you can :)


Thursday, November 4, 2010

Broccoli Cheese Soup

I am almost certain this recipe was thought up one night by someone who needed to use up the ingredients that were lingering in the fridge. I believe this because that's exactly what lead me to make this soup on Monday night. I had 3/4 of a package of broccoli florets from Trader Joe's and a motley crew of cheeses, all needing to be consumed asap.

Everyone keeps a few onions on hand, right? You should if you don't. They last a long time if stored properly, not to mention almost every great recipe starts with butter, onions & garlic! The fragrance of those three simple ingredients cooking away in a pan makes me swoon every-single-time. It never fails.


You can use any cheese you have, really. I just used my leftovers from a cheese plate we brought to a friends house. Anything that will melt. I'm sure there are cheeses that go better with broccoli than others, though. Feel free to experiment.


Since I was sort of winging this recipe when I made it, I steamed the broccoli in the stock, then sort of mashed them up with my potato masher. I then added in the onion roux mixture. After looking up a couple of Broccoli Cheese Soup recipes, it seems you can do the roux, whisk in the chicken stock then add the broccoli to that. Cook until tender and then blend. (See Emeril's recipe I link below)


If you don't usually keep chicken stock on hand, I highly recommend these little packets from Trader Joe's. They give you 12 packets to a box, its is basically chicken stock concentrate. Add 1 packet to 1 cup of hot water and voila! The don't take up any space in the pantry and last for a couple years. Like bouillon. Brilliant.


Below is a basic recipe, feel free to experiment with different cheeses and maybe some spices. Emeril has an interesting recipe here that I may try next time.

ANC's Broccoli Cheese Soup

2-3 tablespoons butter
1 cup white or yellow onion, chopped
1/2 teaspoon salt
1/4 teaspoon pepper
1 teaspoon garlic, chopped
3 tablespoons all-purpose flour
3 cups chicken or veggie broth
1 package of broccoli florets (or frozen broccoli)
1/2 cup half and half
3/4 cup Cheddar cheese
3/4 cup Gruyere cheese 

In a large sauce pot bring the chicken stock to a boil. Add the broccoli and cook / steam until tender, for 10 minutes. Once tender, partially mash the florets with a potato masher to break them up.

Meanwhile, in a medium frying pan, melt the 3 tablespoons butter over medium-high heat. Add the onions, salt and pepper and cook until soft. Add the garlic and stir for about 30 seconds. Next add the flour and stir until all of the moisture is soaked up by the flour. Let it cook for a minute or two to eliminate any raw flour taste. Turn off the heat and stir in the half and half.

Add the contents of the frying pan to the pot of broccoli and stir until blended. Remove from the heat and puree with an immersion blender. Add the grated cheese and stir until melted.

Serve warm with bread sticks or crusty french bread.

Perfect for a cool fall evening with the one you love <3

Thursday, October 28, 2010

Oatmeal Sandwich Bread

The first time I remember baking bread from scratch was when I was living in Toulouse. I somehow got my hands on a copy of Jamie Oliver's "Happy Days With the Naked Chef" and found myself drawn again and again to two recipes. One was a to-die-for Steak Marsala that I ended up making quite often, the other was his basic bread recipe.


If you've seen Jamie you know he has a very... how should I say... free spirited approach to cooking. Little of this, little of that... I just picked this from my garden so I'll add that. You get the idea. I saw a photo in 'Happy Days' which showed a giant mound of flour on a table. You make a well in the center and add the wet ingredients. Start stirring with your finger and you'll gradually draw in the flour from the walls of the well. Keep stirring until it seems like a good dough consistency and then kneed.


Now despite the fact that I could literally throw a tennis ball from the balcony of my flat and hit the front door of my Boulangerie, I decided now would be a good time to start baking bread. So I baked ... and it was amazing. I had never realized how great a reward for such little effort that results from baking bread at home. I just don't think I ever thought about it until seeing that pile of flour in Jamie's cookbook.


I've since tried a few different bread recipes with great success. The one kind I was afraid to try was sandwich bread. This may sound weird, but the biggest uncertainty for me was how to slice it. Here you are being a home baker; you create this great loaf of bread and then you must slice it... Doom and gloom spelled all  over it. You need slices that are not too thick to where all you taste is bread and nothing of what is inside, but not too thin so it tears or breaks or gets soggy. You also need an even hand so the slice is uniform from one end to the other. Sounds like a lame fear, I know. I guess it's the perfectionist in me.


So as my husband says, "Ain't nothin' to it but to do it". I took that to heart, channeled Jamie Oliver and decided to just go for it. I make Scott a sandwich every day for lunch, why not make it completely and totally homemade and bake the bread myself too?


This recipe calls for whole wheat flour, bread flour and oats. A little molasses, some butter and salt and you've got a great hearty sandwich bread that has character and depth, but doesn't take anything away from whatever's on the inside.


Let it rise twice, once in an oiled bowl and once more in the loaf pan you'll bake it in. Whatever you do, do not decide during the second rise that you really must go out to dinner (you'll just bake the bread when you get back!) You'll come home to a Stay Puft Marshmallow Man of a loaf growing and overflowing out of the pan and on to your counter. But if you do, not to worry. Punch it down again, let is rise once more and then bake. I don't know this from experience or anything.....


This is so easy I don't know why I let my fear of uneven slices stop me from trying. If you eat sandwiches, I highly recommend making this bread. Even if you eat toast, or bread and butter with your soup, or if you like french toast, or homemade croutons! Whatever! Just try this bread. It's so worth it.


Lay the cooled loaf on its side. Use a serrated knife and slice with long even strokes. Practice makes perfect!
This was breakfast for my husband this morning- a toasted slice of Oatmeal Bread with scrambled egg and cheddar cheese. Move over Wheaties, this is the breakfast of champions!


The recipe I used is based off a recipe in Good to the Grain by Kim Boyce and Amy Scattergood. I found it via Orangette.

Oatmeal Sandwich Bread

1 package active dry yeast
3 Tbsp. unsulphured (not blackstrap) molasses
2 ½ cups whole wheat flour
2 cups bread flour
1 cup rolled oats
4 Tbsp. unsalted butter, melted and cooled slightly
2 ½  tsp. table salt

Grease a large bowl and a loaf pan with butter or cooking spray.

In the bowl of a stand mixer, combine 2 cups warm water, the yeast, and molasses. Stir briefly, and then allow the yeast to bloom for about 5 minutes. Add the flours, oats, and butter, and stir to mix. The dough will look rough and shaggy. Cover with a towel, and let stand in the bowl of the mixer for 30 minutes.

After 30 minutes, add the salt, and mix on medium speed for 6 minutes. The dough should come together around the hook and slap around the sides of the bowl without sticking. If the dough is sticking, add a tablespoon or two of bread flour, sprinkling it down between the dough and the sides of the bowl. If you don't have a stand mixer, you can knead by hand for about 15 minutes, adding flour as needed. The dough should be soft and supple and slightly sticky.

For the first rise, scrape the dough onto a lightly floured work surface and knead it a few times. Put the dough into the greased bowl, cover with a towel, and leave it to rise for about 1 hour, or until it is doubled in size. To see if it’s ready, gently push a floured finger into it. If the dough springs back, it needs more time; if the dimple remains, it’s ready for the next step.

To shape the dough, scrape it onto a floured work surface. Press down on it, working it into a square shape, taking care to depress any bubbles. Fold the dough down from the top to the middle, then up from the bottom to the middle. Next, bring the newly formed top and bottom edges together, pinching the seam to seal. Pinch the sides together, and roll the shaped dough back and forth, plumping it so that it’s evenly formed and about the size of your pan. Place the dough in the pan with the seam side down, and press it gently into the corners of the pan.

For the second rise, cover the dough with a towel, and let it rest in a warm place for about 1 hour, or until the dough rises to half again its size. While the dough is rising, preheat the oven to 400°F.

When the dough has finished its second rise, bake for about 40 minutes, rotating the pan halfway through. The loaf is ready when the top crust and bottom crusts are nicely browned. To see if the bread is ready, give the top of the loaf a thump with your hand. If it sounds hollow, it’s ready; if not, give it another few minutes in the oven. Remove the finished loaf from the pan and cool completely on a wire rack. Do not cut into it until it is fully cooled.

Friday, October 15, 2010

Cocktail Foods

I don't know about you but I get a little snacky when I am enjoying an adult beverage or two. Tonight is Wine Night, hosted monthly by my sister's friend, Stephanie. The girls get together, drink some wine and catch up with each other. I thought this would be the perfect time to try a few recipes out of my newest cookbook (I'm sure I've already told you about my not-so-secret obsession with cookbooks). It is called "Cocktail Food 50 finger foods with attitude".

I decided to make "Sinful Spuds" and "Pepperoni Pinwheels".... not for any reason other than the fact that I had the majority of the ingredients for both on hand already.

First I made the Sinful Spuds:

New Potatoes stuffed with feta, green olives and pine nuts.

You'll need:

12 small new potatoes
salt
1/2 cup feta
1/4 cup toasted pine nuts
2 tbs chopped green olives
1 tbs olive oil
1 tbs dried currants
1/2 tsp chopped lemon zest
1/4 tsp oregano
24 parsley leaves for garnish

Cut a think slice off the top and bottom of each potato. Then cut in half crosswise. Bring 6 cups of water to a boil, add 1.5 tsp salt. Add potatoes and simmer until fork tender, 10-15 minutes. Be careful not to overcook. Strain and let cool.


In a bowl, crumble the feta. Add pint nuts, olives, olive oil, currants, lemon zest, oregano and pepper. Mix well.


To assemble: Scoop out the center of each potato with a melon baller. Fill the centers with the feta mixture. Garnish with a parsley leaf.


Up next: Pepperoni Pinwheels...


Puff pastry with pepperoni, gruyere and honey mustard....

You'll need:

1/2 cup finely grated Gruyere cheese
3/4 tsp dried sage
3/4 tsp dried oregano
1/4 tsp black pepper
1 puff pastry sheet, thawed
2 tbs honey mustard
2 oz. packaged sliced pepperoni
1 egg, lightly beaten

Mix the gruyere, sage, oregano and pepper in a small bowl. Lay the puff pastry on a lightly floured surface with the short side closest to you. Cut in half crosswise. ** Here the recipe calls for you to arrange with the long side closest to you, but I didnt think my pastry would be long enough to roll over more than twice, so I did short side closest to me.**

Put 1 tbs mustard on each piece of pastry and spread evenly leaving 1 inch on the farthest edge from you. Arrange the pepperoni in a single layer on top of the mustard. The sprinkle the cheese mixture on top of the pepperoni.


Brush the farthest edge with the egg. Roll the puff pastry tightly from the closest edge toward the egg coated edge. Lay seam side down on a cookie sheet and refrigerate for 30 minutes. ** You can do everything up until here up to 1 day in advance. Just keep the rolls refrigerated and covered.**.

Preheat oven to 400. Slice the logs into 1/4 inch thick slices and lay on a parchment lined baking sheet about 1 inch apart.


Bake in the center of the oven, 1 sheet at a time until they are golden brown, about 14 minutes. Serve warm.


Next time you have a few friends over for some cocktails, try one of these recipes! The perfect finger food to accompany your adult beverage :)